Pages

Tuesday, December 22, 2009

Suitcases with Ribbon

Oh yes.  When the suitcases are adorned with beautiful SU ribbons, you know someone is going on a plane.  We are headed home for Christmas, and we are looking forward to it (well, once the next day or so is over!)  Posts may be a little infrequent over the next few weeks, what with traveling, celebrating, walking on the beach (an actual ocean beach!) and of course, the never ending laundry.  Then again, I might just surprise myself (and you!) and manage a post or two...

Oh, and you know those letters from Santa I mentioned a few posts ago?  This is what they look like at the other end...


Saturday, December 19, 2009

More Last minute Holiday Cards

What happens when you sit down with the 'Occasionally' stamp set, some kraft card, assorted coloured card scraps and matching inks and ribbons, and your trusty crimper, in order to make just a couple of last minute  holiday cards?  There is a chance you may get a little carried away, and end up with something like this:


Not just Christmas cards, but cards for all occasions (and this photo was taken after we had given away a couple of the cards already).

After stamping the images on white card, it was a quick job to punch them out with a square punch, mat them on a kraft square made using the bigger square punch, and then attach those to some crimped card, using stampin' dimensionals.  Most of the cards got some coordinating ribbon to finish them off, but a few were left more simple. 

For the holiday cards I made little sets of cards in a couple of different sizes, and some without the ribbon.  They all had the stamped image on the crimped coordinating card though.


The snowman, Christmas Tree, and Candy Cane images were especially good for these cards.  And when I had more than enough of those, I couldn't help myself.  I had to keep going with some other occasion cards like these birthday ones:


I like the fact that this quick and easy design could be used for boys or girls of all ages, just with a quick change of colour.  I especially like them with the wider ribbon, but if you didn't have coordinating ribbon you could use a strip of card and perhaps stamp on a greeting instead.  Use some softer colours and swap the images and you have baby and first birthday cards:


You probably get the idea by now.  Quite a productive morning on the card making front - not so much the bed making and laundry!  Never mind that though, making cards was much more fun, and best of all, if you want to make some for yourself, the 'Occasionally' Stamp Set that I used here is one of several that are currently part of an inventory clearance sale, and is discounted 50% for a limited time.


  To see the full list of discounted products, (with discounts from 25-50%) you can click here, or see the link on my sidebar over there on the right.

Friday, December 18, 2009

Quick little gift tags

It is true that you can find gift tags pretty cheaply (especially from December 26 onwards) but there is something very nice about a hand made tag.  They don't have to take a long time to make, and they don't require a lot of supplies (although of course, you can make them just as fancy and embellished as you like!)

These ones fit right into the quick and easy category.  They are all made using stamps from the 'Occasionally' stamp set.


It really does have something for every occasion, although as you can see here, I have stuck with the Christmas theme for these ones (afterall, it was Christmas gifts I needed them for!) using white card, and then matching ink and coloured card for the back of the tag (real red, garden green, elegant eggplant, night of navy, and baja breeze with a splash of glitter for those little snowflakes).

Tomorrow I will show you the last minute cards I made using the same stamp set.  I might have gotten a little bit carried away!

Thursday, December 17, 2009

Clearly some cool packaging!

Okay, so when you put your gift in clear packaging, you do lose the element of surprise - but somehow it doesn't matter quite so much because it just looks so good!

Miss Bridie decided she wanted to give Hayden's teacher a goodbye present too (being a frequent 'helper' at school, Bridie had formed a lovely friendship with Miss C).  While we pondered gifts that might coordinate with the one Hayden had chosen, Bridie announced that she wanted to give Miss C one of the 'spinny decorations' because they were apparently the prettiest (and she likes spinning them around on the hat pin!)

So that was easy!  It was also the perfect thing to try out some clear packaging that I had been wanting to do for a while.  I used some heavy acetate (saved from some toy packaging, if I remember correctly!) and made one of the super easy and clever triangle boxes.  To add a little bit of interest, I used white stazon ink to stamp little snowflakes on the acetate, and then finished it off with some Baja Breeze ribbon, that perfectly matched the papers used for the decoration inside.
It is a little tricky taking photos of clear packaging though!


Best of all, SU have decided that the white stazon ink, that had been in the recently retired Spring Mini, will continue to be available to purchase, as a 'write in' to the catalogue (that just means it isn't listed in any current catalogue, but is still available to purchase).  Keeping the White Stazon ink company as a write in, will be the staz on cleaner, the scallop oval punch, and the Jumbo brads that had also been featured in the Spring Mini.

Item #
Item
Price
112534
Jumbo brads 5/16" Neutrals Assortment
$18.50
112533
Jumbo brads 5/8" Neutrals Assortment
$16.25
114889
Scallop Oval punch
$35.95
106960
StazOn ink pad (White pad and refill)
$26.95
109196
StazOn Cleaner
$11.75

For details of any other write in products, updates and corrections to current SU catalogues, please click here - or use the link on the sidebar.

Happy Thursday, or Friday, depending on where you are!

Wednesday, December 16, 2009

A Teacher's gift using the Spiral Punch.

Last week Hayden's class said goodbye to the student teacher who had been working in their class for the past few months.  He decided he wanted to give her 'something like that thing we gave Mrs Q' - a decorated notebook and matching pen, so that is what we did.  We used the lovely Haiku papers, and matching So saffron card, and Tangerine Tango ribbon, and made it so that when the notebook is finished it can be easily removed, and a new one put in its place.


We kept the outside simple - with just a jumbo eyelet and bling brad to fancy it up a little.  Instead of a ribbon closure this time we went with a magnetic one (that would be that black thing in the photo above!)

To get the patterned paper to fit nicely to the front of the notebook cover I used the spiral punch along the top.  The only problem with this approach, was that the spirals on the notebook were a lot closer together than the spirals on the punch, as you can see:

So, what to do?  Why, make the spiral punches closer together, that's what!  It may sound fiddly, but is actually really simple.  Firstly I made the paper a little wider than I needed, and then punched it with the spiral punch as usual. I then held the paper over the underside of the punch, and lined it up so that the holes in the punch were halfway between the holes that had already been punched.  I made a mark on the paper where the guide notch on the punch was, and then cut a little square from the corner of the paper.


The next step was easy - simply position the paper in the punch so that the edge of the cut square is against the guide notch, and then punch as usual.  You should be able to see the original holes just to the left of the guide notch.

 
Here is the paper showing you the original holes only, on the left, with the repunched section to the right. 

When you have finished punching the patterned paper, you can match the spiral holes to the spirals on the notebook, and then trim the paper to fit the cover of your notebook perfectly.  Easy!


Make a matching card, and your gift is ready to give.

Tuesday, December 15, 2009

All about the Giving -Part 2

When we asked Campbell what he wanted for Christmas this year
this was it:


Yep.  A goat with an affro.  It was on a brochure that had fallen out of a magazine, and he was pretty sure that is would be about the best present ever.  And funny too.  Yep, that was what he wanted for Christmas.

So we looked at the brochure together (there were lots of other funny animals too - pigs, ducks, donkeys....).  And we read the brochure.  And we explained that the funny animals were really just funny pictures to catch our attention, but that if we wanted we really could buy a goat (or a pig or a duck), except, we wouldn't get it ourselves.  It would be given to a family who really, really needed it.  And no, we didn't know who that would be.

And then Campbell told us that he really still did want to get that funny goat for someone, and was it okay if he used his birthday money?
Yes baby, it is.

And then we felt so proud, because he had realised that although getting presents is pretty fun - especially goats with affros, giving presents can be even more fun.  Even if you don't know who it is that will be getting that present.

And then we went goat shopping, at Oxfam Unwrapped.


Oh yeah, a goat with an affro and bling!

If you want to, you can go goat shopping too.  Or pigs.  Or ducks. (Or even a toilet or clean water). Gifts range in price from just a few dollars to more if you want - corporate gifts welcomed too (you know, for all those big business CEO's who happen to be reading my blog!).

Oxfam will take care of the gift wrapping and delivery.

Please note, these links are for the NZ branch of Oxfam, and gifts will support families in that part of the world - Including Papua New Guinea, Vanuatu, East Timor, Indonesia, or, depending on the gift, emergency supplies to be used where and when they are needed.  If you prefer to support your 'local' branch of Oxfam please visit  www.oxfam.org and follow the links for a gift that truly gives twice.

I promise, it will make your heart feel happy.

(and tomorrow we will be back to the gifts that require scissors and sticky tape)

All about the Giving


Everyone loves getting presents.  We may not always know what we want  (how often have you been a part of the conversation 'What do you want for Christmas?'  and the reply 'I don't know') - but we know we want something!

Then there is the giving.  Giving can be fun too - maybe not so much the shopping part, that can be stressful, especially if you just had a conversation like that one up above.  Definitely stressful!  But it can make your heart feel happy too.

A few years ago we learned about an organisation called Samaritan's Purse.  More specifically, their 'Operation Christmas Child' project.  When we told Hayden about it he was excited to be involved, and announced that he was going to use his birthday money to buy the presents for his 'shoe box kid'.  We have enjoyed taking part each year since, until this year, when we just didn't get ourselves organised in time, and found another way to give instead (a goat with an affro - more on that soon!)

Here is a scrapbook page I did after the first shoebox we filled.  This was before SU made it to NZ, so uses non-SU supplies, and Hayden's own writing for the gift tag/title.  My idea was to make it look like a big gift box - but it is one of those layouts that I have never  been entirely satisfied with.  I love the subject, though and so here it is:


Wednesday, December 9, 2009

Letters from 'you know who'

If you know anyone who might need a last minute reminder not to be naughty, or a pat on the back for being good, or even just to put a smile of their face - this link might be helpful:


Just so that nobody recognises stamps, or papers, or fonts, or handwriting...

But you didn't hear it from me.

Tuesday, December 8, 2009

Catering for those Christmas Celebrations

As part of a European Cultural Fair that Hayden had at school a few months back, he had to find a recipe from Denmark, and then prepare the food (or have his Mum prepare it for him!) He needed enough to share with approximately 120 friends and classmates.  The fact that this recipe said it made about 12 dozen cookies was a big part of its appeal - and as a bonus they sounded pretty good too.

So, with the help of the big stock pot (because our mixing bowls were just too small) we mixed up a batch of Danish Butter Cookie Dough.  Around this time, we decided that in fact the smallest star cutter would be perfect - giving us 'sample sized' cookies.  That of course meant we got a lot more than 12 dozen cookies. This was what 231 cookies looked like all piled up:
And we still had loads of dough left!  Thankfully, the dough freezes well, and we were pleased to have a ready supply of homemade cookie dough just waiting to be cooked whenever we needed it.

Now with December here - not just Christmas, but the beginning of birthday season in our house as well, there seems to be one 'catering opportunity' after another.  I got to thinking that Danish Butter cookies were just exactly what we needed, and would be a great family tradition in the making.  Cookies in the cupboard, and dough in the freezer - ready to go when we needed it, and making life that little bit easier, at this very busy time of year.

It works well for brightly coloured lizards as well!
So here is the recipe for the super yummy, incredibly handy Danish Butter Cookie (Smørdejgskager) recipe, just in case you find yourself with lots of 'catering opportunities' too!   

2 cups soft butter     4 cups sugar     6 egg yolks - beaten
1 cup sour cream     2 tsp almond extract     2 tsp nutmeg
2 tsp baking soda     2 tsp cream of tartar     9 cups flour
6 egg whites - beaten stiff

- Cream butter and sugar then add the egg yolks and beat again.  Stir in the sour cream and almond flavouring.
- Sift nutmeg, soda and cream of tartar with the flour.  Combine with creamed mixture to make a stiff dough.  Fold in egg whites.
- Roll the dough about 1/8 inch thick and cut into desired shapes with cookie cutters.  Sprinkle with sugar.  Place on greased cookie sheets.
- Bake 10 minutes in a preheated 375 degree oven.  Will yield about (at least!) 12 dozen cookies.

 This time round we made half the quantity of dough, and still have more than enough cookies and dough to go around When we use the little star cutter we only need to bake the cookies for around 5 minutes, rather than the ten minutes of the recipe.  We found the original recipe here:

http://www.mindspring.com/~cborgnaes/    (under cookies and small cakes).

And just when you were thinking this was all about the baking and not so much the scissors and sticky tape, here is a quick scrapbook page I made about the delicious Danish Butter Cookies. 
I am still deciding if I want to put this in a Christmas album, a family traditions (old and new) album, or a recipe album, so I kept it kind of simple, and decided to go for an 8.5x11" layout (12x12 just seems a little cumbersome for a recipe book!)  Hidden behind the photo is some journaling explaining why it is we happened to have 231 cookies (plus enough dough over for another 231!) and how this Christmas catering 'tradition' is coming about.  The main part of the layout is simply the recipe, with some clear embossed stars (from the classic stars jumbo wheel) on the background card, just to fancy it up a little bit.  This was a quick layout to put together using the computer for the journaling and title, and I have to say, the recipe album idea is growing on me.

Monday, December 7, 2009

Gorgeous Christmas Decorations

We weren't quite sure what we would be doing for Christmas this year, and so our decorations went into storage along with most of our belongings.  As it turns out, we will be spending Christmas eve on a plane, in an airport, and then in a car midst the holiday traffic, so decorations in storage isn't such a bad thing.  Except, it does feel strange not having any decorations at all in the build up to Christmas, and it seems kind of silly going out and getting new ones.  But making our own?  Now that is a good idea!

So this is where we started.  Bridie calls them 'the spinners' because she likes spinning them around.  I call them about the prettiest things we have made with the scallop punches, and a great way to make use of the 'tricky bits' of the pretties kits (those whole beads, and the hat pins)!
.


And once again, oh so simple to make! For these ones I have used some paper from the Baja Breeze patterns pack.  All you need to do is punch out some shapes (I have used the scallop circle and the scallop square but you could probably use any shape), fold them in half, and then glue them together until they loop around and join up.


Because the paper is double sided, I made the most of it by alternating the two patterns.  The circle ornament was made using 10 punched circles, while the square used 8.  You could use more or less as you prefer.  For these ones I threaded a couple of beads on a hat pin, put the hat pin through the gap at the centre of the ornament, where all those folded edges meet, and then added a couple more beads at the bottom to finish it off.  The hat pins have a 'clutch' at one end to secure everything in place, and a hook at the other end to hang the ornament.   Best of all, if you want to, when you have finished with the ornament you could always take it apart and reuse the beads and hat pin for another project.  If you prefer to make them more permanent you might want to add a drop of crystals effects when you attach the clutch, to prevent it being removed.

Better than a bought one, that is for sure!

Sunday, December 6, 2009

The Perfect 'last minute' Christmas Card

Did you have plans to make your own Christmas cards this year, but time got away on you?  It isn't too late (says the person who hasn't sent too many Christmas cards for a few years now - oops!)  This is a card that was my favourite last year, and which, thanks to its quick and easy nature, is a favourite this year too.


Not only is it quick and easy (I timed myself making one and it took two minutes, including mucking around with the stamp-a-ma-jig to make sure the greeting was straight), economical (with just two layers of card and no extra embellishments) and perfect for mass production, it also has a wow factor that defies it's simplicity. 

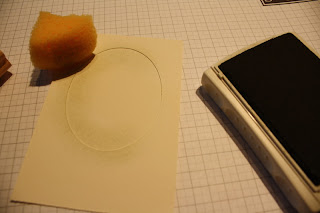
The trickiest bit is preparing the template for the background.  I chose an oval, but any shape will do.  Once you have your template you can reuse it over and over.  I made the outside dimensions of my template card the same size as the vanilla piece that goes on the front of the Christmas card, so that I don't have to think too hard to get it in the right place.  Fast and simple is what it is all about!  In order to keep the template in place while you are working use a temporary adhesive.  I used my two way glue pen, and left it for a few minutes to become tacky and repositional.  This allows you to remove the template when you are done, without damaging the card underneath.  

If you use the two way glue pen remember that when the glue is blue - when you first put it on - it acts as a permanent adhesive, but if you wait a few minutes it dries off and will appear clear, and the adhesive will be temporary rather than permanent.


Now, it is a little tricky to see in this terrible photo, but the next step is really easy.  I used a piece of stampin' sponge to lightly sponge some mellow moss ink around the inside of my oval template.  It doesn't look too flash at this stage, but trust me, when you remove the template you will be wowed yourself.  If it isn't dark enough for you, you can always reattach the template and do a little more sponging.

When the sponging is done, and without removing the template, I used the line of trees stamp (Lovely as a Tree), inked with mellow moss ink, and stamped off gently (I want these trees to be a subtle background) then stamped onto my vanilla card.

Now the background is done, and you can remove the template.  I used Always Artichoke to stamp the single tree, and the greeting (from the Sincere Salutations stamp set) with help from my Stamp-a-ma-jig to make sure the greeting was straight.  Attach to a Mellow Moss card base and you are done.  Well, you could always add a bit of glitter to those branches if you have more than two minutes to spare.


Then comes the hard bit.  Actually sending it to someone!

Wednesday, December 2, 2009

Bouncing Blossom Tutus

Like any girl - big or small - Bridie has plans to be a ballerina/princess when she grows up.  I think the ballerina bit might be her day job - she is still working on the details - not least of all the prince - 'but where will I find my prince?' she asked me. Ah, that age old question.  'You'll just have to keep looking' was my helpful reply.  Sometimes she branches out into fairyland.  As long as she can picture herself in some kind of  frilly fancy fairy/princess/ballerina outfit, she is a happy girl.
So of course I couldn't resist ordering Bridie her very own Bouncing Blossom Tutu for Christmas.  Susie had it sewn in a flash, and ready to post out (keep an eye out Nan). Talk about awesome service!  I chose the 'hydrangea' for Miss Bridie, but they are available in a range of colour combinations - either chose from one of Susie's blossoms, or design your own colour combo for a one of a kind tutu.  Don't they look pretty?

These gorgeous girls belong to Susie and Matt - Oceana and Bridie used to go to Playcentre and Mainly Music together in Waihi Beach. We haven't had the pleasure of meeting sweet baby Naomi in person but she is reminding me a lot of when we first met the Sams girls - and teeny little Oce was walking already!  Walking!  Already!  (about nine months old early).   Whew!

In amongst chasing babies Susie has just launched Bouncing Blossom Tutus and is taking orders now (and if you get in quick you should have it for Christmas).  Please head over to her blog for all the details of colours, sizes, prices etc.  I know she is happy posting out NZ and USA orders (the tutus are light, so it only costs a few dollars to post) and if you are somewhere else I am sure she will happily send to you too (okay, check with Susie on that, but I am sure it won't be a prob, if you are happy to pay the postage).

I expect to have lots of photos of a VERY happy Bridie blossom from Christmas day, so I will be sure to share that smiley face! 

Monday, November 30, 2009

Thankful for...

Having just enjoyed our first ever Thanksgiving (and just quietly - we cooked us a pretty yummy turkey!) we have well and truly been in 'thankful for...' mode lately.  It occurred to me that there are a few SU things that I am thankful for...
  • Thankful for all the lovely people I have met through this passion/obsession we share!
  • Thankful for the lovely ladies who support my efforts to be a demonstrator - thank you!
  • Thankful that SU's vintage brads not only work fantastically as temporary replacements for lost screws in my sunglasses, they work so well that they might even become a permanent part of my sunglasses.  Talk about made for the job!
  • Thankful that there is no more waiting for the new summer mini catalogue

Despite the fact it could be dangerous!

  • Thankful that I now have a keyboard with an 'H', because, between you and me, it has been rather frustrating not having it for the past few months!

  • Thankful for the circle scissors, and the new circle punch, and the butterfly punch, and all the fun projects my wider demonstrator team have come up with for using the new sweet treat cups... (okay that is really just another thankful for the summer mini!)
  • Thankful for the fact that when my paper trimmer wasn't where it was supposed to be today, it only took me a few minutes to find it in the boys room.  Last time it took me a few days.  Partly because of the mess in their room.  Partly because it just didn't occur to me to look in the boys bedroom for my paper trimmer.  Silly me.  Where else would they put it after I asked them to please put it away when they were done?!
  • Did I mention yet, how thankful I am that the wait for the summer mini is over?!
Hoping that next time I post it will to share some projects.  But I have a feeling it's going to be one of those crazy weeks!   Anyone else fixed their sunglasses with brads before?  I tell you, it works great!

    Monday, November 23, 2009

    Yummy Scrummy Muffins all ready to go

    Remember this stunt muffin?

    Well today was the day to bake the actual muffins - Apple and Cranberry - yuuummm!!  While the muffins were cooling the kids and I lined up around the table and got a proper little production line going.  I was going to take a photo of them in action but then realised we were probably breaking umpteen different child labour laws, so perhaps photographic evidence wouldn't be the best!  Instead, here is a photo of those well dressed muffins all lined up and ready to go.


    Campbell was a little concerned that we wouldn't know which ones were which once we put them all in one spot.  Then he realised that we could just look at the tags - because, afterall - his colouring in was WAY better than Bridie's - 'she just used all orange...'  I assured him that Bridie's teachers will love all orange just as much as she does.  That made it okay (just as long as they don't get mixed up in the mean time!)

    Sunday, November 22, 2009

    The Grown Up Version

    So for the grown up version of this card (and this, the original one) I put the bug stamps away, and decided instead to use the big flower from the Eastern Blooms set.  The design of the card was exactly the same again, just the colours (this time tangerine tango, more mustard, so saffron and old olive) and stamps changed, and this time I left off the brads.


    The tango squares were punched from crimped card, and I used the mat pack to piece around the edges of the mustard squares.  To add even more textural interest I added a fun centre to those flowers.  First I used my cropadile and punched holes in a scrap of saffron card.  Next I gathered up all those little punched circles.  They do come out with a slight bend in them, and usually I would flatten them off, but for this project I decided to leave them as they were, to help with the texture.  I decided that crystal effects would be the best adhesive to use and initially planned to put a blob on the centre of the flowers and then cover it with the saffron circles.  I discovered that although they were holding fine, it wasn't as easy to stack them all up in a pile, the way I wanted.  Since I was making this up as I went along anyway (are you surprised?!) I decided to turn these squares into textured, glossy tiles instead, by covering that little pile of saffron circles, and the rest of the stamped square too, in crystal effects.  This way you can still see and touch the textured centre of the flowers, with no risk of anything falling off, and the high gloss centre doesn't look out of place, because the entire square looks the same.


    I really like the way the tiles, and indeed the entire card has turned out, and will definitely be adding this to my list of techniques to use again.

    Saturday, November 21, 2009

    A Girly Birthday Card

    For me, the thing that always takes the longest, is figuring out the initial design of a project.  Sometimes I have a clear idea in my mind, and other times I just wing it and see what happens.  And then there are times like this, where I recycle a design I have used before.  This buggy boy birthday card is still one of my favourites so I decided to do it again - but this time with a girly look to it.

    Apart from changing one of the bug stamps (all still from the Bugs and Kisses stamp set), and of course the colours, I decided to keep the rest of the card - the placement of the different pieces and the extra embellishments (brads, crimped squares and paper pierced squares), exactly the same as with that first card.  That meant I didn't spend time shuffling bits around and trying to decide what looked best (I can spend a LOT of time shuffling things around!)


    After my recent successful outings with the bold brights I decided to keep it up, but must confess, I think I prefer them in smaller doses.  Nevermind.  I am hoping that it will still appeal to a little girl, even with all those bugs on it - oops, I mean big girl.

     Speaking of big girls, I have also made a more grown up version. No bugs this time, but still some fun elements, so that will be the next post.

    SU mini catalogue and promo news

    I have some projects waiting to share, but technical difficulties mean I cannot get to the photos again, and the posts just won't be the same without the photos - so, while I wait for Peter to come home and figure it out for me, I thought I would make a quick public service announcement instead.

    The Stampin' Up! NZ/Aust Spring Mini Catalogue is coming to a close.  You can click on the link over in the side bar (to the right) to view this mini catalogue online, or contact me ASAP if you prefer a paper copy - I think there may still be a couple floating around.

    November 30 is the last day to order product from this mini catalogue, and I can tell you that nothing from this mini has been carried over to the new summer mini that will be available from December 1.   This includes the very popular scalloped oval punch, the handy white StazOn ink, and the even handier StazOn Cleaner.  It is possible they may return in future catalogues, but your guess is as good as mine on that one - I do know they are not in the upcoming Summer mini.

    As for the Summer Mini - I can tell you that there is some fun, fun stuff in there - stamps, punches, papers, embellishments - and if you are a fan of circles you are in for a treat!  I will have the online link available here on December 1 so you can see what I am talking about.

    While I'm talking SU stuff I should also mention the promotions that are running at the moment.  Firstly a great Christmas one.  SU have put out a Christmas Gift Giving Guide  that includes a variety of products.  As an added bonus, when you spend $105 on product from the guide you get to choose a free punch - either the scalloped square punch, or the boho blossoms punch - FREE.  This promotion is available until December 14.  If you are wanting product for Christmas gifts I would recommend ordering ASAP though.

     The second promotion - The SU Breast Cancer Awareness Programme, is one for new demonstrators. 


    For every new demonstrator who signs up before 31 December Stampin' Up! will donate $5 to the New Zealand Breast Cancer Foundation.  In addition, you will receive FREE a pack of Raspberry Tart papers, and a Pretty in Pink Classic Ink Pad.  For more information about what is involved in becoming an SU demonstrator you can check here or contact me.


    Saturday, November 14, 2009

    Packaging for a Morning Tea Treat

    I was inspired by the latest NZSU challenge based on the clever packaging idea that Donna Calley had on her blog, and especially loved that beachy theme that Donna had used.  I decided it could be a fun way to package up some muffins for a special morning tea treat for the teachers (except I don't think they call it 'morning tea'!) and went with a northern hemisphere autumny look instead.
    Introducing the stunt muffin:

    Since we haven't baked the actual muffins yet, and it is still a few days before we need them anyway, we decided that a nice piece of screwed up newspaper would double nicely as a stunt muffin - for blogging purposes anyway!

    This pacakaging was a little shorter and wider than the original, to make room for a muffin without it being reduced to crumbs.  To fancy up that really rust card a bit I stamped it with one of the stamps from the 'Lovely as a Tree' stamp set - with a touch of old olive ink along with the rust ink.  The image on the tag is from the 'Window Dressing' hostess set.

    Surely that has to be the best dressed stunt muffin in town!

    Friday, November 13, 2009

    And now a Christmas Carousel Note card.

    While I was playing around making this carousel note card, I got to thinking that those carousel notes did look a little bit like a mighty big Christmas ornament, and how that could work well for a Christmas card.  So that became part two of my carousel note challenge.  To add to the fun I decided to work with a non-christmas stamp set that is another of my favourites, and which I know a lot of you have yourselves - the ever lovely Baroque Motifs.  (I should point out here that the greeting came from the 'Occasional Greetings' set and not Baroque Motifs).  I have probably said it before but this is such a versatile set - beautiful for backgrounds or the main focus, and any and all occasions - including Christmas.  I used a Ruby Red carousel note, and teamed it up with some kiwi kiss, for a more traditional red and green christmas look.


    This time round I decided to work with just one of the carousel notes as the front of the card, and then attached a more conventionally shaped card behind it.  This way you get the scalloped circle look, but can still stand the card up easily, a bit like an easel. 


    After stamping up the vanilla circle with the vines, flowers and greeting, I sponged the edge of the circle with kiwi kiss ink, and then used a two way glue pen to add a dash of diamonds to the flowers - Christmas just wouldn't be Christmas without some glitter.  It doesn't show up so well here, but in real life - it's sparkly!


    The top of the 'ornament' was made from a round tab punch of kiwi card, folded in half then adhered to the top of the carousel note (purely decorative this time, not an actual hinge like on the last card).  The finishing touch was a kiwi kiss ribbon bow at the top of the ornament, and some stamping and sponging on the inside of the card.

    This really was a quick and easy card to make, but I think it looks really special, and definitely a little out of the ordinary. This card could even double as an ornament - just by threading some linen thread, or even some more ribbon, through the folded round tab at the top.  Might not work so well on those really little trees though!

    Thursday, November 12, 2009

    Carousel Note Birthday Card

    Confession time.  I love the 'Carousel Notes' and have used them for a few different projects, such as this cute handbag mini album, but I don't think I have used them to make a card yet.  Not one that I remember anyway!   So I decided it was time for a new challenge to myself, and that was simply to make cards using Carousel Notes. (What's a carousel note?  It's a nice big (approx 15cm across) scalloped circle of card, complete with nice square choc chip envelopes,  just crying out to be loved!)

    I'm not sure why I haven't done this earlier, as they are perfect for a card with a difference, without the need for complicated or time consuming fancy folds etc.  For this card I decided to use two of the baja breeze carousel notes, and team it up with a splash of kiwi kiss...  

     I stamped some flowers on a circle of white card using baja blue and kiwi kiss inks, and then added the sentiment in Kiwi Kiss.  The edge of the circle was then sponged with the blue ink, (although this was later hidden!) and I also sponged lightly over the blue flowers.

    To help tie in the kiwi kiss inking a little better, I decided to add a circle of kiwi kiss card as a mat.  Now is when I confess, that in my haste to cut that circle the ends of the cut didn't quite meet up.  Normally this probably wouldn't even be noticable, but when you lay it between two other circles it is kind of hard to miss!  Since I didn't have a definite plan of where this card was headed (did you sense that already?) I decided to do a little experimenting before cutting another mat - hoping to hide that slightly imperfect circle shape, and add some textural interest. I wet the edge of the card and then rolled and scrunched, in the same way I had on this layout, and then left it a few minutes to dry.


    I am really enjoying the resulting contrast between those elegant flowers and that rough and bumpy border.  A little rhinestone brad was the finishing touch before attaching it all to the carousel note.  I then lightly sponged the edge of the carousel note with some of the kiwi kiss ink to help tie it all together.

    I used the round tab punch to make a 'hinge' to attach the two carousel notes, making it into a card, and then added another stamped white circle to the inside to finish it off.


    Recipe for this card:
    Carousel Notes (1 pack includes 4 each of Kiwi Kiss, Ruby Red and Baja Breeze)

     Kiwi Kiss and Whisper White Card
    Kiwi Kiss and Baja Breeze Ink
    Fifth Avenue Floral stampset
    A Little Birthday Cheer stampset
    Rhinestone Brad (circle ice)
    Round Tab Punch

    Wednesday, November 11, 2009

    A masculine Birthday card

    Well it seems the little problem we were having accessing our photos on the computer was not so much a computer problem, as it was a problem with swinging feet - kids feet that is - swinging, as they sat at the computer, and inadvertently disconnected cables.  Annoying, but now that we know what was happening,  much easier to fix than a real computer problem might have been!

    While we had our temporary photo freeze out I was able to get a few projects done though, and am slowly working my way through the long list of cards needed over the next few months.  I also thought it was about time I did a colour challenge - and found this one of Makeesha's that was just what was needed.  The colours - chocolate chip, close to cocoa, really rust and vanilla are perfect for a classic man card, as is the  'sanded' background stamp, and the soon to be gone Spring Mini catalogue stamp set - 'Sense of Time'.

    I also started off with some of the lovely jumbo brads from the spring mini, but when it came time to put them on they just didn't quite work how I wanted.  While I was playing I remembered a great little embellishment idea that I first saw long ago on a project by Jacque, and decided to throw that in the mix instead.  I had been wanting to try it for ages, so this was the perfect opportunity.  I will confess to a brief moment when I questioned the ability of my cropadile to chomp through all those layers, and then neatly set the eyelet.  Apologies Cropadile - it was wrong of me to doubt you - you worked just great - as  you always do.


    I wavered between the hemp twine and twill tape to finish it off, but decided that the twine had a little bit more of a - I don't know - 'she'll be right temporary man repair' look about it? (perhaps a cable tie would have worked well here?!)  Glad I did go with the twine, as having just checked the link for Makeesha's challenge I realised she has a similar embellishment on her card.  Don't want them looking too alike!

    And so here is where I ended up.  A nice manly card with a hint of fancy, but not the frills (or is that frills but no fancy?)  Either way it has lots of layers, and a good manly weight to it too!   Best of all, another card marked off the list, and another one coming soon!

    Tuesday, November 3, 2009

    'I've got my eye on you' Halloween mini album

    My big old monster eye that is!


    Here is the first of my Halloween inspired projects.  Halloween candy inspired that is. Hayden was delighted to find an eyeball candy in amongst his trick or treat stash.  I was delighted to find the packaging that eyeball came in, and immediately claimed it as the perfect embellishment for a scrapbooking project.


    I thought it was a bit too bulky for a conventional scrapbook page, but on the cover of a mini album it is just perfect, and I decided to go with an accordian spine album like this one.  Once the candy had been disposed of (thanks boys!) I was left with the plastic bubble, complete with red veins.  It was a quick job to punch out some circles of card for the eye, and pop those inside the packaging.  Best of all, the eye then fitted perfectly inside the 1 3/8" circle I had punched in a chipboard coaster. 

    Originally I was going to cover the coaster with plain black card, but it looked a little too flat.  Instead I stamped with versamark ink and the sanded background stamp, and then heat embossed with clear powder.  It looks a bit too shiny in the photo, but is better in real life, and looks like a reptilian monster skin.  The back cover also has the embossed sanded look.  Inside it is black pages, and that is as far as it got - the printer ran out of ink before I could print the photos, so completing the inside of this little halloween memory book is still on the list of things to do.

    So far I am loving this little project, and would love to do some more - I can see this in green, for dinosaur lovers.  I will confess, that while buying groceries today, I did keep an 'eye out' for some more of those eyeball candies.  No luck though, so it is looking like I might have to resort to cleaning the kids bedrooms, in the hopes of finding more discarded candy packaging...