Did you have plans to make your own Christmas cards this year, but time got away on you? It isn't too late (says the person who hasn't sent too many Christmas cards for a few years now - oops!) This is a card that was my favourite last year, and which, thanks to its quick and easy nature, is a favourite this year too.
Not only is it quick and easy (I timed myself making one and it took two minutes, including mucking around with the stamp-a-ma-jig to make sure the greeting was straight), economical (with just two layers of card and no extra embellishments) and perfect for mass production, it also has a wow factor that defies it's simplicity.
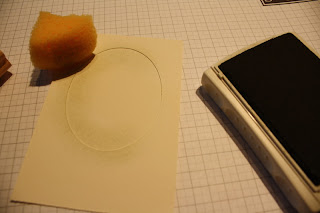
The trickiest bit is preparing the template for the background. I chose an oval, but any shape will do. Once you have your template you can reuse it over and over. I made the outside dimensions of my template card the same size as the vanilla piece that goes on the front of the Christmas card, so that I don't have to think too hard to get it in the right place. Fast and simple is what it is all about! In order to keep the template in place while you are working use a temporary adhesive. I used my two way glue pen, and left it for a few minutes to become tacky and repositional. This allows you to remove the template when you are done, without damaging the card underneath.
If you use the two way glue pen remember that when the glue is blue - when you first put it on - it acts as a permanent adhesive, but if you wait a few minutes it dries off and will appear clear, and the adhesive will be temporary rather than permanent.
Now, it is a little tricky to see in this terrible photo, but the next step is really easy. I used a piece of stampin' sponge to lightly sponge some mellow moss ink around the inside of my oval template. It doesn't look too flash at this stage, but trust me, when you remove the template you will be wowed yourself. If it isn't dark enough for you, you can always reattach the template and do a little more sponging.
When the sponging is done, and without removing the template, I used the line of trees stamp (Lovely as a Tree), inked with mellow moss ink, and stamped off gently (I want these trees to be a subtle background) then stamped onto my vanilla card.
Now the background is done, and you can remove the template. I used Always Artichoke to stamp the single tree, and the greeting (from the Sincere Salutations stamp set) with help from my Stamp-a-ma-jig to make sure the greeting was straight. Attach to a Mellow Moss card base and you are done. Well, you could always add a bit of glitter to those branches if you have more than two minutes to spare.
Then comes the hard bit. Actually sending it to someone!


I've always loved this card as I was lucky to get it as a swap once - so beautiful IRL
ReplyDeleteThank goodness you got one too Karen - I had to check the photo on your blog to remember just how it was done last time round!
ReplyDeleteThanks so much for the instructions on how to do this Tracee. It's one of my favourite cards using Lovely as a Tree. Now, I'll have to make my own :)
ReplyDelete