Pages

Showing posts with label pick a petal. Show all posts

Sunday, March 29, 2009

Sweet Baby Boy layout

So I've updated the photo, and here it is. It's a little bit better. My sweet baby boy, in a photo with me - unheard of!


This layout was inspired by an Ali Edwards layout. Although I had to change it quite a bit. I couldn't find my white 12 x 12 card, so went with blue instead, and my chipboard frames were circles and squares instead of hearts (and yes, I probably could have made my own, but when I started this layout I thought it was going to be a quick one - no time for that!) It probably would have helped if I had have had a photo in mind, before I started painting and stamping, but there you go, sometimes you just have to dive on in.

So after the initial diving in, I got a bit stuck - not such a quick project after all! This is also a little removed from my usual straight lines and simple. Not only did I not use a ruler once, I didn't even use my paper trimmer. Find a straight edge if you can!

The initial idea was more of the 'make your own patterned background' theme. This time I started by roughly painting the bashful blue card with acrylic paint (white with a hint of blue), leaving the blue card visable round the edge like a border.

Over the top of this, to add some interest, I used the super handy 'lots of dots' jumbo wheel, from the summer mini catalogue. I am loving this wheel (even though it is probably kind of boring!) and am really disappointed to find out it hasn't returned in the new catalogue. Apologies in advance - you will probably see this one used again in the future - retired resmired I say!

I inked the wheel up using my bashful blue inkpad (and then a little bit of not quite navy, applied to the wheel with a sponge) rather than a cartridge. Once the wheel has been around once the image will start to fade BUT - I knew the middle would be covered over so could work it so that was where the faded bit was. Also, because I was going for a 'quick and easy thrown together' project, I kind of figured it didn't matter if some dots were lighter than others - it just adds to the interest. I went over it a few times anyway - sorry it doesn't show up so well in the layout photo, but you should get the idea from the closeups.


I also painted over the chipboard frame, and then sponged bashful blue, and not quite navy ink around the edges of the chipboard, and roughly over the rest of the frame.

The rest was made up of bits and pieces. Some yummy wide bashful blue stitched grosgrain from the mini, flowers from the pretties, dyed with night of navy ink (see this post to find out how to do this), some hand cut vellum hearts - with piercing round the edges, and some stamped up images from assorted stamp sets - mostly retiring - but not at my house!


I also managed to throw in a petal from the pick a petal set - see it up there? I didn't ink the smile word on the stamp - instead I left a gap and wrote my own word in, then used the inside of the petal to write the date.

I must confess, I am not entirely convinced that this is quite finished. But I guess that is what happens when you try something new. What I did enjoy was all the playing, experimenting, and DIY. And that another empty sleeve in the album is empty no more!!

Ingredients for this one (ones in bold are retiring tomorrow - several are discounted!):

Bashful Blue., whisper white, and night of navy card, vellum
bashful blue and night of navy ink
On Board Ginormous Pieces chipboard frame
flowers from Pretties kit
Bashful Blue double stitched grosgrain ribbon
Lots of Dots jumbo stampin around wheel (and handle)
ABC Alphabet Lower
Stamp of Authenticity
Office Accoutrements
Pick a Petal
Everyday Flexible Phrases
Expressive Flexible Phrases


Friday, March 27, 2009

I've been hibernating...

...it's been snowing, the schools have been closed, and my initial idea of - yay - stay home and do some scrapbooking, quickly changed to - oh - stuck at home with my three (sometimes two) lovelies - scrapbooking may not be an option!! We did take some photos though. Ideas for scrapbook projects - does that count?!
I had also planned to do a few little projects to show off some more ideas for my stamp pick for this month 'pick a petal'. The month isn't officially over, quite yet, but things aren't looking good. Little projects haven't been happening. Neither have bigger projects. So here is a list instead. And one photo, to pretty things up...

how about flames for a candle? This is from the stamp club project for the month. Tell me you couldn't use that flower petal stamp for a candle flame on a man card if you wanted to? Great for kids cards too - add just the right number of candles and you are all set.
Other ideas I have seen or dreamed about:
  • bugs - of course - butterflies, dragonflies, ladybirds (the spotty petal stamp is perfect for ladybirds)
  • christmas cards - why yes! Petals turned into christmas ornaments, all strung up. I can see you are not convinced on this one, but believe me, it looked good!
  • exclamation mark - a great big one.
  • An alternative to arrows - I think these would be great on a scrapbook project
  • Little journalling spots, doubled as an alternative to arrows.
  • I showed you a funny face already. I saw a really clever bird made with this set. I cannot even begin to do it justice. I plan to replicate this one, one day....
  • 101(+) flowers....

Making that little list has me feeling all inspired again. Maybe I will have some photos to show you all soon, afterall! But then again, it is a snow day...

Monday, March 23, 2009

pick a petal flowers

Okay, so I have been telling you how versatile this set is, and how great it is for things other than flowers, but it goes without saying, that it is of course great for making flowers!
These cards are cased straight from a very talented Australian demonstrator - Sarah Klass. I saw them months ago, and have been planning to make them ever since. I did change the colours though - wasabi, so saffron and pumpkin pie were used for these thank you cards - and they certainly had a nice sunshiny feel to them.
Once again these were quick and easy - cut a square of white card, stamp the petals directly on, stamp the flower centre on a scrap of white and punch it out with a 1" circle punch, stamp the thank you, and then stick it all together. I put the flower centre on with stampin dimensionals to give it a bit of a lift. Done!

Tuesday, March 10, 2009

Pick a Petal Funny Face

I told you I would share some other uses for the very versatile 'pick a petal' set - other than the obvious making of flowers. How about this idea? I am not sure who the clever person was who first thought of this, but I have seen several versions around, and it looked like a quick and easy card. Turns out it is!

Of course, you could make this funny face happy or sad, but this one is for my sister who has been unwell, so upside down smile seemed to be the way to go. That is also a DIY sentiment - using rough edges alphabet and the '?' borrowed from the expressive flexible phrases set. Colours are pomegranate (because it was the top of the pile) and artichoke, (because it is a yummy green, and it went with the pomegranate!)

Doesn't look much like a flower does it?

Wednesday, March 4, 2009

Pick a Petal

This set, I am pleased to say, is not on the SU retiring list! It is a set that I was slow to discover, but am now loving the versatility of. For stamp club this month we will be making a birthday card with this set - with not a flower to be seen. I would even go so far as to say, depending on colour choices, it could be perfect for a masculine card - the hardest ones to make!


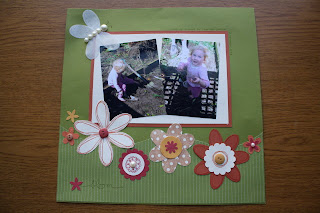
This layout was my first play with the set. The truth is, when I did the layout, I didn't even know what I would use it for, otherwise the colours may have matched Bridie's grubby pink outfit a little better (and yes, still working on the photos!) I did know that I wanted to try out some different flowers, and of course, make a 'bug'. The rest kind of evolved (are you sensing a theme with my creativity?)

Recipe for this layout:
  • Pick a Petal Stamp set
  • Bloomin' with Beauty Stamp set (spring mini - soon to be returning perhaps?!)
  • Cardstock - old olive, really rust, very vanilla, more mustard, ruby red
  • Ink - old olive, really rust, creamy caramel, ruby red, whisper white
  • Old Olive Prints Designer Series Paper (currently on the retiring list)
  • Vellum
  • Pretties Kit (half pearls)
  • Buttons (Earth Elements, Earth Elements and Neutrals - both retiring)
  • Scallop Circle punch
  • Spring Flower Bouquet punch (retiring)


To make the bug I used whisper white craft ink and stamped on vellum for the wings. You could also emboss this, but I was feeling lazy. A heat gun will help to dry the ink more quickly, and prevent smudging when you cut them out. (I got the heat gun out to dry the ink, but didn't emboss...!) The body and head of the bug are made with half pearl beads from the pretties kit. The antennae were first pierced, then I went over them with an olive marker to help them show up a little better. Looking at it as soon as it was done, the antennae should have been longer, but this was my first pick a petal bug, so that is how it ended up. Learn from my mistake! And please note, I cannot take total credit for this wee creature - there were several versions flying around on the internet last year, and that was the inspiration for this one.

The flowers, of course, were the easy bit. Choose a petal, choose a middle, add a button here, and a punched flower there - arranging them always seems to be the tricky bit. The old olive patterned paper was a great way to add a little interest (and perhaps a hint of stems?) behind the flowers, without taking attention away. I have really enjoyed the subtle patterns of these single coloured papers. I think we will be getting them again in the new in colours, but not sure about those old favourites such as olive and celery.

(Stamp club ladies - this was the layout that inspired last months card - can you see it?)