Pages

Friday, November 12, 2010

scrapbooking disguised as homework?

I had been so sure that when the kids went back to school I was going to have lots of leisurely craft time ('lots' being relative to the zero leisurely craft time I had during the summer break!)  As it turns out all that sunshine must have caused some memory loss, because I had forgotten about the fact that when school went back we would be busier than ever.  Never mind the leisurely craft time, it's all about the taxi driving, the school activities, the taxi driving, the after school activities, the work trips for Peter, the taxi driving, and trying to keep on top of the laundry.   Then you need to remember those other key ingredients that seem to have been lacking lately - inclination and inspiration.  There has been a bit of a craft drought around here lately, so thank goodness for homework!


When Campbell came home and told me he had to make a family tree for school, and asked if I had a stamp he could use, I was pleased to tell him I had something even better.  It was the perfect excuse to finally try my new Big Shot, and the 'little leaves' sizzlet die, and in no time at all he had more than enough leaves for his tree. It took a lot longer to stick them all on!  The tree trunk and grass we cut by hand, and he used punches to cut out all the photos and name labels.  We used a piece of 12x12 card as the base for the family tree, so that when he was finished he could put it straight into his album, and he is so pleased with his first ever, made it himself, scrapbook page.

I am pleased that the craft drought may finally be breaking, even if it is just homework disguised as scrapbooking!

Saturday, September 4, 2010

Beautiful Wings Butterflies

Another little taster from the new catalogue for you, and I think this product is going to prove very popular - the gorgeous little embossilit die - Beautiful Wings.  I just love the detail and texture you get with these butterflies - five different butterflies (I have used four on this card, there is another, larger butterfly too) and they are so quick and easy to make. 

The colours I have used are Regal Rose (a Rich Regal colour from previous catalogues), and the fruity cocktail of Tangerine Tango (an 'in color' from the last catalogue) and Melon Mambo (from the last mini catalogue).  These three colours now join together in the renamed, regrouped Brights Collection (along with Pumpkin Pie, Old Olive, Tempting Turquoise, Pacific Point, Rich Razzleberry, Real Red, and the new Daffodil Delight).

The front of the card has some texture thanks to the Perfect Polka Dots embossing folder.  The greeting is from the Teeny Tiny Sentiments stamp set.  I was tempted to add some ribbon, but decided that the polka dots and embossed butterflies provided enough texture and interest.   As a bonus, the card is less bulky (and so easier to post!)

These beautiful little butterflies make the perfect embellishment, and are just one of several new dies and embossing folders that the new catalogue has on offer.  Remember that if you don't have a big shot, most of these (including the Beautiful Wings Embossilit die) can also be used with your cuttlebug.

Thursday, September 2, 2010

Something Old, Something New...

something that has come out of retirement, and of course, something blue!  No, nothing to do with a wedding, just a card I made to show you some of what is in the new catalogue.  Can you guess which is which?

Something old (Carried over from the last catalogue):
Fifth Avenue Floral Stamp Set (the flower on this card is made from several flowers that have been stamped, cut up, and reassembled)
Cropadile (the little circles in the centre of the flower were punched using the cropadile) and 1" circle punch (for the curves at the end of the greeting)
Something New:
Scallop Trim Border Punch (I used it all around the outside of the mat, and I love it!)
Something that has come out of retirement, or back from a mini:
River Rock  - an old 'in color' that is making a comeback - yay!
Teeny Tiny Sentiments Stamp Set - back from the latest mini catalogue - a very versatile greeting set.
Something Blue:
Baja Breeze - an 'in color' from the last catalogue, that has returned as one of the revamped core color range.
Now, while I love this new border punch, I must confess that my favourite part of this card is the flower.  I love the texture it has, with a few of the petals turned up, and that lumpy, bumpy flower centre.  Worth the effort of cutting out all those flowers anyway!

The new SU! Catalogue is here!

Just in case you hadn't noticed already!  Contact me if you would like a copy of your own, or you can click  here, or on the link over there on the sidebar, to view it online.  In addition to some exciting new products I was also pleased to see some of my favourites from recent mini catalogues are returning, in addition to some of the most popular products from last years catalogue that have been carried over.

The biggest change, and the one that will take me a bit of getting used to, is the colours in this new catalogue.  With the launch of this new catalogue we also get the introduction of the new Stampin' Up! colour range.  Remembering that a lot (a LOT!) of colours have just been retired, the new range includes some brand new core colours, some 'in colors' from previous years that have come out of retirement and are also now part of the core colour range, and of course the new in color range for this year.  Lots of exciting new colours for us to play with, and SU have put together some great value kits to help us get out hands on them.  Click here, or on the colour kit link also over on the sidebar, for more information about those kits.

SU! also have a special offer for new demonstrators available this month.  If you sign up to become a demonstrator not only will you get the usual fantastic deal on your starter kit ($590 worth of product for just $339), but this month only, you will also get the new In Color kit (inkpads and cardstock) worth  $100.90, completely free of charge.  I think that is the best new demonstrator deal SU have ever offered.  If you want more details about that, please contact me, or I can put you in touch with one of my talented team members.

Monday, August 30, 2010

Headbands with SU! embellishments

While we have got a bit of a hair accessory theme going on, I thought I would show you Bridie's new hairband collection as well.  These were inspired by some rather pricey (and out of the question!) headbands that Bridie spotted while we were out shopping one day.  She was rather keen to bring some home, and wasn't really convinced that we could make some ourselves, for a fraction of the price, and that ours would be even prettier!  We grabbed some plain headbands instead, and went home to check out the embellishment stash (and it was around that time that Bridie was swayed to my way of thinking - bling will do that to a girl!)  Here is what we have come up with so far:

Like the flowery hair clips that we made, these headbands would make a great little gift, and I have no doubt that there will be more one-of-a-kind, fancy headbands being made, in the not too distant future!


Sunday, August 29, 2010

Pretty Flowery Hairclips

Now that Bridie has a place to keep her hair clips, she needed a few more flowers to really make it look like a cottage garden.  So I dug out my felt flowers and eyelets and we transformed some plain metal clips into pretty, one of a kind, flowery hair clips (well - two of a kind, because we made them in pairs!)  They are so easy to make, and would make the perfect little gift for a girl who loves her hair accessories.
I used my cropadile to make holes in the clips (actually, I got Peter to do that bit, because his muscles are a bit bigger than mine!) and then it took no time at all to attach the flowers using a coordinating eyelet, and the cropadile again.    Disclaimer time - while the cropadile handled the hole making job with relative ease, please remember that any time you use it for heavier duty tasks like this there is a risk you could damage it.  If you don't want to use eyelets to attach the flowers you could always use crystal effects, or a hot glue gun.
Bridie is very pleased about her new hair clip stash, and the hair clip holder to keep them inAnd with all those pretty new flowers, it really is looking like a cottage garden, don't you think? 
Next up, Bridie's fancy new headbands!

Saturday, August 28, 2010

Cottage Garden Hair Clip Holder

Recently I was looking at some crafty blogs, lamenting the fact that I don't have my sewing machine with me, and I came across a great hair clip holder idea at little pumpkin grace.

I thought it would be perfect for Bridie, who is not very good at keeping her clips in one place (let alone in her hair!)  I decided instead of fabric, I would make use of what I had on hand, and the cottage wall papers worked perfectly with the frame I had.  To make the paper a bit sturdier (I didn't want it ripping the first time we put clips in it) I applied several coats of modgepodge, to both sides of the paper.  It worked perfectly.  The paper was now more of a cardboard weight, but more flexible, and a lot more durable.  
 I used the reverse, non dotty side of some razzleberry ribbon for the clips to attach to, and finished the frame off with made it myself embellishment  - a ribbon flower, also using the razzleberry ribbon, and a touch of old olive ribbon and a button.
Not only is it a great way to keep Bridie's hair clips together, it also helps to pretty up her room.  She is very happy about that!  She is even happier with the clips we decorated to go in the holder. - the flowers to go in this cottage garden. The clips in the photo are the 'before' version, but I will take some photos of the 'after' version tomorrow, along with some cute headbands we decorated.  Very stylish if we do say so ourselves!

Wednesday, August 25, 2010

New 25 -50% Discounts on retiring product!

Stampin' Up have just announced some additional discounts on selected items from the retiring/last chance list:

Item # Page    Description    Discount    Discounted NZ Price
116342    42    Big Bold Birthday 50% $    31.98
116408    100    Seeing Spots 50% $    17.98
116344    121    Big Deal Alphabet 50% $    45.98
116208    126    In Color card stock (A4) 50% $      8.63
105538    127    Bold Brights Stampin' Write markers 25% $    51.71
105537    127    Soft Subtles Stampin' Write markers 25% $    51.71
105540    127    Rich Regals Stampin' Write markers 25% $    51.71
105541    127    Many Marvelous Markers 25% $  209.96
 105550     128     Bold Brights Classic Stampin' Spots  25%  $    37.46
 105551     128     Earth Elements Classic Stampin' Spots  25%  $    37.46
 105539     128     Earth Elements Stampin' Write markers  25%  $    51.71
 105552     129     Rich Regals Classic Stampin' Spots  25%   $    37.46
112042    132    Urban Garden Designer Series paper 50% $      9.98
112041    134    Bella Rose Designer Series paper 50% $      9.98
107305    152    Oval Large punch 50% $    17.98
113692    152    Eyelet border punch 50% $    17.98
109043    152    Scallop Circle punch 50% $    17.98
113694    152    Heart to Heart punch 50% $    17.98
112082    152    Wide Oval punch 50% $    17.98
112091    152    Scallop Edge punch 50% $    17.98
113693    152    Full Heart punch 50% $    17.98
104310    155    Crafters' Tool Kit 25% $    68.96
112004    AW28* 1-3/4" Circle punch 50% $    17.98
116629    CO* Butterfly punch 50% $    17.98
As with all product that is retiring these items will only be available until the end of August, or while stocks last.  To see the complete list of retiring product you can click here.  To see a list of product that is running low, or sold out already, you click here, or on the link at the top of my blog (right under the photo of Campbell and Bridie admiring their scrapbooks!)

Contact me ASAP if you would like to order any of this retiring product.  With discounts like this it is likely to go fast!

Friday, August 6, 2010

Baby Shower Butterflies

I am loving the single butterfly stamp from the mini catalogue, and when I needed a card and gift bag for a baby shower recently I decided that the butterfly would be perfect for a sweet baby girl and her mama, (who has two boys already and so not a lot of pink butterflies in her life!) 

I used the retiring Pink Pirouette patterned papers to make the gift bag, teamed with pink pirouette ribbon for the handles, and an assortment of pink inks for the butterflies on both the bag and the card.  

The sentiment is from the nursery necessities stamp set (also on the retiring list) because it had to have a hint of baby to it.  Alas the photos are worse than usual (an overcast morning on top of our cave like apartment don't make for happy photos) but hopefully you can see enough to get the gist of it!


Wednesday, August 4, 2010

A Clipboard for the Teacher

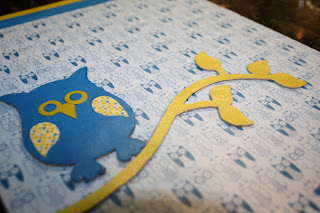
Recently we needed to come up with a gift for Campbell's teacher. Something that would be useful, and not too flowery and frilly.  A nice, useful, masculine gift for the teacher.  After a bit of thought we decided to decorate a clipboard, and this is what we came up with:

We decided to go with an owl theme -  decorating the back with one wise owl on a branch (chipboard from the So Tweet On Board Pack, covered with card, and papers from the Good Morning Sunshine DSP pack) and lots of eager little owls awaiting instruction covering both sides of the clipboard (another sheet of paper from the Good Morning Sunshine pack).  We personalised it using letters made with the Timeless Type Junior Alphabet dies from the Autumn/Winter mini catalogue, and then finished it off with some strips of coordinating card (pacific point, kiwi kiss) and some ribbon.  Several coats of modge podge help to seal and protect it all.

Campbell was really pleased with his gift, and the teacher was most appreciative. Best of all it was a relatively quick and easy project, and inexpensive too.  Perfect for mass production!

The kiwi kiss cardstock, Good Morning Sunshine DSP, On Board So Tweet, Kiwi Kiss ribbon, and Pacific Point Ribbon used in this project are all on the 'last chance list'.  Available only until 31 August, or while stocks last.

Last chance to get Retiring SU products...

The new Stampin' Up! Catalogue is just a few weeks away, so of course that means last chance to get those products that will be retiring.  The full list of retiring product can be seen online here.  I'm not going to list them all in this post because there are nine pages of retiring products this year - eek - remembering of course with the colour renovation we are saying goodbye to lots of colours (ink, card, embellishments) to make way for some lovely new colours.   
There are 95 stamp sets in the catalogue that are retiring, as well as 15 stampin' around wheels (8 standard size, and 7 jumbo) and all of the hostess sets.

You will see that the punches all appear on the retiring list.  This is because they are being 'reconfigured' into the new punch style we saw in the latest mini catalogue.  

There are five punches that will not be returning though, and these are:
  •  Small Star
  • Trio Flower
  • Double Rectangle
  • Horizontal Slot
  • Slit
You will also see that some products have been discounted (25-50%) and there are some great bargains.  Some of the highlights of the discounted retiring product:

Three punches - Boho Blossoms, Scallop square, and the scallop oval punch are all 25% off.
17 of the stamp sets are discounted by 25%, and these Six stamp sets are 50% off:
  • A Happy Heart (page 34) now $24.98
  • Best Wishes and More (page 53) now $28.48
  • Greetings Eight (page 57) now $29.48
  • Only Ovals (page 93) now $23.48
  • Enjoy Every Moment (page 97) now $31.48
  • All Scallops (page 105) now $33.48
Many of the markers in the retiring colours are discounted (usually $6.75, now $5.06, or even $3.38 for a couple of colours!) as are many of the stampin' around inked cartridges.

Four of the Simply Sent kits are reduced by 25%

Six of the patterned paper packs are 25% off, and Pink Flamingo has 50% discount (now only $9.98 for 12 sheets of paper)

The Simply Scrappin' kits are all retiring, and the I Wish" Simply Scrappin Kit (page 137) is discounted by 25% 

Lots of embellishments are being retired (ribbons, brads, buttons, chipboard, assorted flower embellishments, rub-ons and glitter) and there are some great bargains to be had here too.

Double-Stitched ribbons in Rose Red, Chocolate Chip and Bashful Blue (page 150) are 50% off - now only $11.75 Several of the other ribbons have 25% off.

The Chunky Sprinkles Glitter (page 145) is also discounted by 50%  (now $18.98 for four colours).

Both the 'Flower Fusion', and 'Flower Fusion Too' felt flower packs as well as the 'Blooms Again' cardstock diecut flowers (page 144) are discounted by 25%.

The 'Blooms' cardstock flower die cuts (also page 144), are 50% off.


Don't forget that all of these retiring products will only be available until 31 August, or while stocks last.  I will try to keep a list up to date of what is running low/sold out already! You can find it by clicking the 'What's gone already?' tab at the top of my blog (right under the photo of Campbell and Bridie looking at the scrapbook).

A reminder also that the Autumn/Winter Mini catalogue will also be ending on 31 August.

Let me know if there is something that you want to order.

Saturday, July 17, 2010

Share a Cup gift card holder

When I saw the 'Share A Cup' stamp in the autumn/winter mini catalogue I knew it would be perfect for making some cute little holders for some Starbucks gift cards we were planning to give as gifts.  I teamed it up with the new Rich Razzleberry card, ink and polka dot grosgrain ribbon also from the mini (and returning in the upcoming new catalogue too).


I just inked up the cup part of the stamp (leaving off the 'hello' greeting this time).  I love the way the polka dots on the cup match the polka dots on the ribbon.  Made for each other!   This was a quick and easy project that made the gift cards that little bit more special (and hopefully easier to find in a handbag!)

Wednesday, July 14, 2010

More Big Bold Birthday for Boys

So here is the second card of the 'Big Bold Birthday' stamp set pair:

Much the same idea as the first, but just the one candle this time, and some ribbon thrown in, just because it matches so well! Best of all, these cards would work well with any colour combination, and for birthdays of all ages.
I feel a production line coming on!

Tuesday, July 13, 2010

Big Bold (Boys) Birthday Card

I have long been a fan of the 'Big Bold Birthday' stamp set.  I suspect that when the new SU catalogue comes out this stamp set will not be there, which is a shame because it really is so versatile.  After all - everyone loves presents and cakes right?!  It was perfect for a birthday card for Campbell's friend last week, complete with just the right number of candles on the cake:

I crimped a tiny scrap of 'Good Morning Sunshine' patterned paper to make the cupcake paper, and that was also the inspiration for the colours used.  Some glitter on top of the cupcake and of course those candles, add a bit of sparkle (just enough to make it fancy, but not enough to make it girly - heaven forbid!) and some quick wheeling with the Happy Happy Birthday jumbo wheel helped to finish the card off.  

We wrapped the gift in plain paper and left the card out of an envelope (hanging it from some coordinating ribbon instead) to show it off.  The boys approved, so I decided to make another similar card while I was on a roll, to put away for the next party.  I'll post that one tomorrow.

Wednesday, June 30, 2010

Capturing those travel memories (an alternative to the traditional scrapbook)

We have been very fortunate over the past 18 months in that we have been able to do a lot of traveling together as a family.  We have seen lots, learned lots, made so many wonderful memories, and taken a LOT of photos.  

Those of you who know me well may be shocked (SHOCKED!) to discover that not a lot of scrapbooking has taken place.  Yet.  As always, I have some very good reasons for my procrastination.  I am not convinced I want to do each page in triplicate (one for each child) and then another one for me.  I thought about doing a page for each child from their perspective, and then an overall summary type page for our family album, but that will be an even bigger job.  I started to wonder if the kids will even care if they get a page for every trip?  Could I wait for the end of this particular adventure, and then do a few summary pages for each album with some highlights?  Maybe. I think I might do something like that.  Or maybe something else?  I am still formulating my plan when it comes to the traditional travel scrapbook!  

In the meantime we did come up with a great way to capture those travel memories, in a way that is useful as well as ornamental.  We bought the kids a blanket each, and they have been collecting blanket patches on our travels.  We tried to imagine a big map outline on the blanket and attach the patches in roughly the right spot, so that helps the kids to remember where we have been too.  

They are all very proud of their blankets, and the patches that they have - many of them they have earned through Junior Ranger Programs. It does help to have Nan come for a visit though, when you have a backlog of patches to attach! Some areas of the blankets have more patches than others, but we told them when they are older they can come back themselves and fill in the gaps.  For the boys especially, I think that is more likely than them adding scrapbook pages to the album.

Another bonus to getting the patches is that they often come with a handy piece of cardboard that has a brief overview of the place we have visited.  

 You can be sure I am squirreling those away for the day when I finally get around to some actual scrapbooking of our travels!

Tuesday, June 29, 2010

Been taking a break...

Oh dear.  Has it really been a month since I posted here?  I guess I have been taking a break!  A frenzy of school trips and parties and concerts, as well as family visits, and the resulting traveling and exploring and having fun, has been keeping us busy.  Not much time spent on crafty stuff.  I did do some thinking and talking about crafty stuff.  That counts, right?  I did acquire a couple of new toys tools. That has to count!  I just didn't have the time (or was the inclination?) to blog about it, but hopefully that is about to change.   The new USA Stampin' Up! catalogue is about to launch, and that will give us a good indication of what we will see in the new NZ/Aust in September, not to mention a lot of wonderful new inspiration (and inclination!)  I am wondering how the internet will handle all those eager people, hitting the SU website on July 1?   Just don't crash before I get there!!

I do have a couple of projects (alternatives to the traditional scrapbooking methods of perserving those travel memories) that I have been working on, one of which should hopefully be arriving in our mailbox today.  I am looking forward to sharing those, along with a couple of teacher gift projects that we did a few weeks back.  Just have to find the photos.

Taking a break is also a very good excuse to get back into some crafting today.  Although we might have to go and buy some more masking tape first.  Hayden has been doing some creating of his own - making monsters and dinosaurs from an old phone book and a lot of masking tape.  It is keeping him nicely entertained.  Now, how to keep the other two out of trouble?!

Friday, May 28, 2010

Some Sunshine for the Teachers

Not a lot of crafting happening in this house lately, but we did take some time out from all our activities this week to make some little gifts for Bridie's teachers.  The combination of Washington Apple patterned paper, and the saffron and red riding hood card and ribbon really gave this 'post it 'note holder project a bright and sunshiny feel.  Bridie was really pleased with them, and her teachers loved them.  Success all round!

Wednesday, May 5, 2010

A Challenge Card for Mother's Day

First things first - Mum, Look away!

Okay, now on with the show.  Creative time has been a little short around here lately, and when that happens, I find that challenges are often just the kick start I need to get creating without too much mucking around and wasting of precious time.


For this card I used two different challenges for my inspiration.  The first was the Inkspiration Inspiration Challenge #21:


The second was the Sweet Sunday Sketch Challenge #67 :


I used the 'Fifth Avenue Floral' and 'Short and Sweet' stamp sets, an assortment of inks and markers (saffron, pretty in pink, rose red, regal rose) and card (pretty in pink, regal rose, and pink pirouette) and finished the flower off with a half pearl bead from the pretties kit.  The patterned card started life as a plain white piece of card, but some stamping and sponging transformed it into a perfectly coordinated patterned piece instead.

Hoping to squeeze in a bit more craft time tomorrow - probably with the help of another challenge or two.   Blogging about it though, is a whole other 'wait and see' kind of story!

Tuesday, May 4, 2010

Party Favours for 10 Year Old Boys

Earlier in the year we celebrated Hayden's 10th birthday.  Last year he had only been at his new school about a week, and so a party with friends was not on the agenda, but you can bet he wasn't going to miss out this year!  Instead of a party though, he and his friends decided they really wanted to go to a movie.  The boys have all read and enjoyed the Wimpy Kid series of books, and they all agreed that 'Diary of a Wimpy Kid' was the movie they wanted to see.  Of course, the movie hadn't actually been released when they made this decision, but they agreed it would be worth the wait!

Which worked out well for me too - it gave me time to figure out what to do about those party goody bags.  Do 10 year old boys even need party favours?  (a quick survey revealed that YES! We HAVE to have goody bags Mum!)

And then I remembered the pile of hardcover notebooks I had in my bargain box.  I had originally picked them up (for just $1 or $2) thinking they might be good for teachers gifts.  Instead, I realised they would be perfect for the boys - which just a little bit of 'decorating' by me first.

I wasn't sure if the boys would appreciate being called 'wimpy' themselves, so I took the liberty of changing it to 'awesome' instead.  I was still a little nervous about how they might be received, and was so pleased to see that the boys all loved them.  And just quietly - if you need to keep a group of ten year old boys quiet at a restaurant while you wait for the food to arrive - give them their own diary to write in - I think the staff were shocked at how well behaved and quiet they all were (and I don't think their teacher would believe it without photographic evidence!)

As for the thank yous - we figured we had two choices.  Hayden was  initially leaning towards a note with a booger attached (actually a glue dot carefully coloured with ink!) but then when I made a 'stinky cheese' prototype he decided that would be better.  Nothing like giving your friends the cheese touch!  


Disclaimer time:
1.  If you haven't read the book you will just think I am being gross now - but I assure you - boogers attached to notes, and stinky cheese slices were not my idea - it is all taken straight from the Wimpy Kid, and despite the gross factor - ten year old boys - and their six year old brothers, love it!
2. While the diaries are great for keeping kids quiet, it is a good thing you don't give the thank yous out right there in the restaurant.  Yelling and running and kids having fun is pretty much guaranteed.  Quiet time - not so much!

Monday, May 3, 2010

Spreading Some Sunshine!

Well lucky me!  The lovely Helen Williams sent me some sunshine yesterday.  If you need a present for Mother's Day Helen has some gorgeous bookmarks over on her blog, not to mention a very clever circle flip up book.

Having received the sunshine award, it is now my turn to pass it around!

Here are the ‘rules’ for the award.
1. Put the Sunshine Award on your blog and/or within your post.
2. Pass the award to other bloggers.
3. Link the nominees within your post.
4. Let them know they received this award by leaving a comment on their  blog.
5. Share the love and link to the person from whom you received the  award.

So, the bloggers I am going to send the sunshine to are all a wonderful source of inspiration and support to me - lovely ladies who I have been lucky enough to have met through Stampin' Up.

In no particular order, please help me send some happy thoughts the way of:

Rachael Knight
Roz Begbie
and Diane Robertson

If you have a few minutes please go and see the wonderful creations these ladies have been making (maybe have a snack before you visit Diane as she is frequently making wonderful things in the kitchen and making me feel hungry with her posts!)

Thanks again Helen.  You made my day!

Sunday, May 2, 2010

Inspired by... Sparkly Shoes!

Take one little pair of sparkly shoes:

Add some card and pink ink, sponging and masking, vintage vogue stamps, a butterfly punch, heat and stick powder and some dazzling diamonds glitter...


And you get one happy afternoon and a pretty girls birthday card, which I think fits in with the latest challenge (Birthdays?) over at Corrosive Challenge.

Now just to get to the Post Office....

Tuesday, April 27, 2010

More Vintage Vogue

I promise you - it took less time to make the cards than it did to blog about them!  Paper mache rocks for Hayden's Shakespeare Club performance have been taking up my time - but all finished with now, thank goodness (and pretty realistic looking they were, if I do say so myself!)

So back to the vintage vogue one sheet wonder...  This lot of cards really were quick and easy.  Sponged edges, crimped card strips, layers of card,  stampin' dimensionals to pop some of the elements up, and a quick stamped sentiment (or a selection of those things!)  


The second card was super basic - a strip of the stamped one sheet wonder card matted on some perfect plum card that had been crimped and a quick sentiment stamped in coordinating ink.  I could have added so much more, but sometimes it is nice to keep it kind of simple (and if I remember correctly, I was due at the bus stop right about then!) 


Of course, the plan was also to use every last little scrap of my original stamped one sheet wonder card (I still had some left after these cards), so the rest of that strip I had cut for the last card, was cut into squares to make this one.  Originally I had been planning on having another longer strip but with a different card orientation to the last one, but somewhere along the way it transformed into this.  But that is what the playing is all about - making stuff up as you go along, and having fun doing it!

Tuesday, April 20, 2010

The first of the Vintage Vogue 'One Sheet Wonder' cards

Before I show you the first of the cards I made I want to quickly explain what my understanding of 'one sheet wonder' is.  For me it is getting a plain old piece of card (in this case white, but it can be whatever you want) and going to town with your stamps and inks and decorating up the entire piece of card.  I am a fan of Do It Yourself (DIY) patterned papers, and this is exactly what this is!  When you are done you have a one of a kind patterned card that you can then use for all kinds of coordinating projects.  
One sheet wonder = DIY patterned paper
(at least, that is my take on it!)

What I like about it is that not only are you guaranteed to get the perfect patterned paper for your project (!), it is also a great way to just play, and is especially good for when you are in the mood for creating, but don't have a specific project in mind. I used the lovely new vintage vogue stamp set and grabbed perfect plum and pale plum, along with mellow moss as my ink colours. You can see it all stamped up and ready to go in the last post, if you didn't already :)  When it came to making projects I just needed to pull out the coordinating card and other embellishments, and play some more. Easy and fun!

Obviously the patterned paper was all flowery and pretty and best suited for girly projects (which, when I set out, was going to be an assortment of cards, little gifts, mini scrapbook project...  but ended up being all cards!)  My first thought was how nice a butterfly would look with that flowery background:

I punched out one butterfly in each shade of plum.  I used silver cord to tie them together, and threaded on some little silver spacer beads from the pretties kit for the body (I always forget to use those little spacer beads!)  The pale plum butterfly was then attached flat to the card front, and the darker, top butterfly has the wings free, and folded up to look like it is flying. 


I sponged the edge of the patterned card, and added another girly touch with the eyelet border punch, but didn't bother with a sentiment.  Sometimes it is good to have an 'any occasion' card on hand, and you can always add a sentiment to the inside of the card as needed.

I really liked that butterfly embellishment, so added one to the next card too - although this time with a couple of loops of silver cord instead of beads, for the butterfly body.  

I stamped one of the sentiments from the vintage vogue stamp set on a scrap of card, and added that too, along with some more scraps (I don't have any plum ribbon, and was too lazy to colour any, so card strips made an easy alternative).  I did run the moss card strip through the crimper first though, to add some interest.  And that crimping led me to the next group of cards... (coming soon!)

Sunday, April 18, 2010

Still Here!

Oh my goodness - I have been a slacker on the blogging front lately, and just quietly, craft time has been hit and miss lately too.  Family time has taken over.  That and housework.  And school activities.  And family adventures, and taking photos, and blogging about family adventures (I have a tendancy to want to explain every little detail, and that has a tendancy to take a lot of time, as some of you may have noticed!) and school assignments, and upset tummies, and did I mention housework?! 

We have another crazy week coming up, but I have made a promise to myself that there will be some crafting in amongst it somewhere, and some crafty blogging too.  And just to show you that I mean what I say, here is a little glimpse of what I have been playing with - the very beautiful vintage vogue stamp set that has just become available in the newest NZ/Aust mini catalogue  - I will be working on updating the catalogue links over there on the sidebar this week too!


Now I know that this 'one sheet wonder' doesn't look that exciting right now (not to mention the terrible lighting), but it is in the process of being transformed into some lovely projects that are a lot more exciting, and I promise that it won't take me another 5 weeks to get around to sharing them!

Wednesday, March 10, 2010

Another Masculine Card

Recently Hayden's class had a unit on Ball Room Dancing.  They had lessons over several weeks, culminating in a 'Red Hot Ballroom Dancing' competition, which they all loved.  They took it really seriously too, with all the kids dressing up for it - meaning, for the boys - shirt and tie (for the lessons and the competition). Hayden does have a tie of his own, but when one of his teachers produced a box of ties for the kids to borrow he decided he would do that instead.  Which was great for me - it gave me the perfect opportunity to make one of these men's tie cards :
I had seen a tutorial a while back, and had filed some notes away in a folder.  Unfortunately I failed to note where I saw it, so if you know please remind me so I can give credit where it is due.  

I had intended to have a more, well, 'sophisticated' tie on the front of this card, but then I saw the 'Good Morning Sunshine' papers and it reminded me that the ties in the borrow box did tend towards more of a 'retro' feel.  I teamed the tie up with some saffron, pacific point and chocolate chip card.  It is a little hard to see in the photo, but the tie and 'collar' really pop up off the card.  I think it will work really well as a thank you to Mr D from Hayden.

Friday, March 5, 2010

Lots of Candles Masculine Birthday Card

Some days I don't feel much like crafting.  Some days I don't feel much like blogging.  And then there are entire weeks when I don't feel much like doing either.  Obviously this has been one of those weeks!  Thankfully there are lots of challenges out there to help me get back into it, and inspire this manly birthday card I made this afternoon:


The colours came from the latest Stamping 411 Colour Inspiration - old olive, not quite navy, close to cocoa and more mustard.  The design was inspired by the latest Mojo Monday sketch, although as you can probably tell, I did manage to put my own spin on it again.  These things have a tendancy to evolve a bit in the making!  

 Never mind, still got me back into the crafting and blogging - at least for today anyway!

Stamps used for this card:  'Sanded' background, 'Big Bold Birthday' (candle) and the SAB set - 'Whimsical Words'