Pages

Tuesday, February 23, 2010

The 'Back and Forth' Book

One of the treasures I had stashed away in the box of bargains was a simple exercise book (or composition book, if you prefer!)  Not exactly an amazing bargain, but I had bought it with a specific project in mind.  I wanted to use it as a 'back and forth' book for our son Hayden, in an attempt to encourage him with his writing.  Now if you know Hayden you know he doesn't lack good topics to talk about, or the words to do it (and he can do it for a loooong time!)  When it comes to writing though he is not so keen.  Why write it when you can just say it?!  I figured anything is better than nothing though, and a book for him to write whatever he wants for us to read, and for us to write back to him, might be worth a try (and hopefully wouldn't feel too much like homework!)

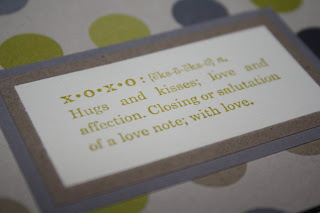
We could have just used the exercise book as it was, but I think that if it looks kind of special, then he might take it more seriously, and even treasure it a bit more.  I am pleased to say the effort was worth it - he thinks it is pretty cool, and the other kids are lining up now to get their own (I might have to check what else I can find in that bargain box!)  I didn't take a before photo - I am sure you can picture it in all it's 'ready for school work' glory.  Here is the after photo - and not a hint of school to be seen:
At first I was planning to use the Baja Blue patterned papers, but when I went to get them from the box I saw this spotty paper from the Urban Oasis pack, and changed my mind. I am so glad I did.  I think the baja papers might have looked a bit too baby boy, while this combo looks much better suited to a newly turned 10 year old.

Being stingy, I wanted to use just one sheet of paper to cover the front and the back of the book.  Of course, it wasn't going to be wide enough, so I used some narrow strips of 'going gray' and a kraft spine to hide the gaps.  I added some double rectangle punching to the edge of the kraft card, to let the gray show through, and add a little interest, without getting all girly.

The 'To you, from me' bit was done using the long retired (but not forgotten!) Newsprint Alphabet stamp set, with kiwi kiss ink.  I matted it on gray and kraft, and added a few linen thread stitches to fancy it up a bit. I also added a touch of twill tape, to match the piece that attaches to the spine, that will be used to mark our place in the book.  Love those built in book marks!
I finished it up with a few circle embellishments.  The Wild West Alphabet 'H' was punched then matted on a 1 3/4" circle of kraft card that fitted perfectly in the aluminum metal edged tag.  I added a couple of circle and star designer brads next to that and three plain little silver brads at the top of the kraft spine.


Inside the book I kept it pretty simple - after all, writing is supposed to fill that bit up!  I couldn't resist adding a little bit of encouragement and inspiration though, so searched my stamp sets for appropriate stamps, cut them out and attached them to random pages throughout the book.


And there was one last embellishment added to the back cover (so not quite so obvious) - a little bit of icky 'Mum loves you' stuff!


So far, so good with the back and forth book.
Not too homework feeling at all!

Monday, February 15, 2010

You & Moi Scallop Notes

Okay, so one last valentine project to share - this time the little cards I made for my children.  I used a couple of the stamps from the 'You & Moi' set and the handy little scallop note cards that are in the current Summer Mini Catalogue. 
 
I stuck with baja blue for the boys, with a not so frilly stamp, and for Bridie - pink pirouette and a flower, of course.  

Both designs had a bit of silver thrown in as well, the image was popped up with dimensionals, and I added a little loop of ribbon to fancy it up.  I extended the front of the card with an extra white scallop, and finished it off with some more silver card.

Bridie asked if she could keep it forever?  Of course you can baby girl!

Sunday, February 14, 2010

Matchbook Style Chocolate Holder Valentines

Last year for Valentines Day we wanted a quick and easy card to make.  While the card we made last year was a straight forward card, and reasonably quick to make, all those knotted ribbons were a bit of a pain.  This year both of the boys needed valentines, meaning we had twice as many to make, so I went executive on it, and declared there would be no ribbon!  Instead we decided to make some chocolates (well, melt chocolate and then put it into molds with assorted NZ images) and I figured out a little matchbook style holder for them, which could double as a card.

 I cut a piece of card 7.5cm x 21cm (which meant I could get four from each A4 card) and scored it at 2cm, 11.5cm, and 12.5cm.  
I then cut a stack of white card pieces - 6.5 x.6.5cm (12 from each A4 card).  It was a quick job to then stamp assorted images on the white squares and attach them to front of the matchbooks.

I used the same friend sentiment that I had for Bridie's valentines (from the 'cheep talk' stamp set) and stamped it inside the matchbook.  While the boys then signed their names, I put the chocolates into little bags and stapled them into place, with the folded over opening of the bag, tucked under that 2cm flap.
I was expecting it to take a long time, but in fact it was much quicker than I thought it would be.  Waiting for Campbell to sign his half was the slowest part of the process, but mainly because he kept stopping to watch I was doing!

60 Valentines later...  they looked great, and smelled better, but alas, we didn't have any left over.  The boys didn't seem to mind though - they both came home with a bag full of assorted goodies they had received from their friends.  Let the sugar high pass quickly!!

Saturday, February 13, 2010

Valentines for Bridie's Friends and Teachers

This week the kids have all had Valentines parties at school, which of course requires them to have valentines to share with their classmates.  Although it would have been a lot easier to go out and buy some (we needed quite a few after all!), what is the point of having a cupboard full of crafty stuff if you don't use it?  So the production line was started up again, and 78 valentines cards were made.  

First up were Bridie's.  Initially she wanted them to have cars for boys, and flowers for girls, and all sorts of different colours.  The potential for tears (from Bridie and her friends) if they didn't get the 'right' colour or design convinced me to convince her, that maybe we could stick with birds instead. After all, the friend sentiment in the 'cheep talk' stamp set would be perfect for preschool valentines cards, and those little birds really are cute: 
 
We broke out some card from the retired pile (because kids aren't worried about a little detail like that!) and satisfied Bridie's desire for different colours, by alternating a pomegranate mat on a wasabi card, with a wasabi mat on a pomegranate card.  The stamped card front was the same for all the cards.  She was pretty happy with the results, and quickly set to the serious business of signing all those valentines:

We had had plans for some baking for the teachers,  but didn't quite get there.  With all the valentines we were making, as well as Hayden's birthday this week (and  the associated baking that went with that) we decided to go for a quick and easy little bag of chocolates instead.
  

We wrapped some Raspberry Tart patterned paper around the chocolates to pretty them up, put a matching little topper on the bag, and finished it off with one of the clever flowers that Megan McDonald has been inspiring us all with this week.

I think I will have to keep a stash of these chocolates hidden away for those times we need a quick little gift.  It is easy enough to choose a paper to suit (pretty and girly or all masculine and tough) - and who doesn't like chocolate? (or know someone to share it with?)

Wednesday, February 10, 2010

'Celebrate You' Scrapbook Layout

A few months back I made this carousel note card using the always lovely 'Fifth Avenue Floral' stamp set.  As I played around trying to figure out what I wanted to do, I ended up with two of those stamped circles.  When the card was done I set the spare stamped circle to the side, and imagined it on a scrapbook layout, with a few more circles, and another carousel note.  And it has been waiting ever since.  Well, until now that is.


It turns out that getting myself organised was the hardest part.  I already had that 'celebrate you' stamped circle, and the scalloped baja blue circle is a carousel note - all ready for me to just add some journaling.  I used my circle scissors to cut out the small kiwi kiss circle, and then all those blue and kiwi rings in varying widths.


The finishing touches were some butterflies from the 'Butterfly Prints' stampset, with a touch of bling to match Bridie's tiara.  I am really pleased with how it all came together, and Bridie is very happy to have another layout in her album.  Her favourite part?  Why, the tiara she is wearing in the photo - of course!


All the bits and pieces:
card - basic grey, kiwi kiss, baja blue, white
ink - basic grey, kiwi kiss, baja blue
stamps - Fifth Avenue Floral, Butterfly Prints, A little Birthday Cheer (the 'celebrate you')
other - baja blue carousel note, basic grey stampin' write marker, circle scissors, butterfly punch, rhinestone brads (ice, circles)

Tuesday, February 9, 2010

Simple but beautiful butterfly card

I am really loving the butterfly stamp from the 'Dreams du Jour' set right now.  I love the fact that it is an outline stamp, so if you want to colour it in, like I did for this Kristina Challenge card, you can.  I also love the fact that there is enough fine detail in that outline, that if you want to, you can just stamp it out in a single colour and it still looks fantastic - especially if you have a few in different colours:


For this card I really wanted the focus to be on those butterflies, and originally set out to have just some stamping on a single piece of white card.  Unfortunately the white card, while perfect for stamping on, is not the heaviest, and the card seemed a bit too flimsy.  Instead I trimmed it up and attached it to a teal card base, to match that teal sentiment.  I was pleased with the finished look - having the teal didn't take away from the butterflies at all, and I think I ended up with a more balanced card.

 
The colour combination of taken with teal, real red, and apricot appeal came straight from the latest Stamping 411 colour inspiration challenge.  I used my stamp-a-ma-jig to get everything positioned just where I wanted it, but other than that, this card was super simple, and I now I think I love those butterflies even more!

Monday, February 8, 2010

A flower for all occasions

At the Stampin' Up Convention last year, I was fortunate to have my achievements recognised.  Although I missed the opportunity to be congratulated in person by Shelli Gardner - the co-founder of SU (a small matter of me not actually being at the Convention in Canberra!) I did still get my name up on the big screen, and later, received congratulations, a pin, and the stampset 'A Flower for all Seasons'  I am a little ashamed to admit, that although I have often admired the stamps, I have only just now gotten around to using them.

As I sat using them I thought to myself that these really are the kind of stamps you could use for any occasion (and then I realised - duh - that will be why they are called a flower for all seasons).  After using most of my brain cells figuring that out, I decided I should probably keep the cards easy, so this is what I came up with:

I went with a kraft card base again - I really love the way you can pair this card up with any other colour combo, and it will look good.  I wanted to keep the embellishments to a minimum, and use up some of my card scraps that have been accumulating, so decided to go with a couple of card strips, with a scallop edge to one of them.  I ended up making a set of them, using three of the four different images, and several different sentiments (birthday, thanks, get well soon) and colour combos:
Best of all, these images, while perhaps not so great for those male recipients, are perfect for girls of all ages - so my girly birthday card pile has increased with the addition of these quick and easy cards.   That has got to be a good thing, right?!

Wednesday, February 3, 2010

A Bold Bright Card with a Tropical Feel

It is no secret that the Bold Bright colours are not my most favourite - although I have been trying to use them more lately and have been pleasantly surprised more than once!  I do love the Kaleidoscope patterned papers though - they seem to me to be a slightly subdued version of those bold brights, and so not quite so scary!  They do make me long for a nice Fiji holiday though - I think they have a fun tropically kind of look.

So of course when I saw those wine glasses in Makeesha's inspiration photo, I thought of a nice fruity drink to go along with those tropical papers.  Here is the photo:
And here is the card:
I based this card on the latest sketch from Stamping 411 again, but abandoned the planned brads for knots in the ribbon instead.  Because the colours in the paper are not too bold and bright, I was able to use pumpkin pie ribbon, even though the card is a nice bright only orange, and I don't think it looks out of place.

Not quite a Fiji holiday, but it is sure to brighten someones day!

Wanted - A Pretty Pony Card

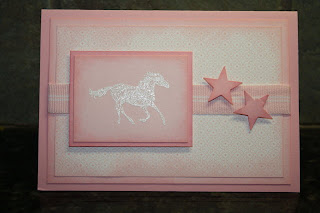
Cousin Maya is turning 8.  She loves horses, and is lucky to have her own white pony named Star.  When it came time to make Maya's birthday card the choice was easy - use the horse from the 'Wanted' stamp set.  Most of the projects I have seen and made using this set have been with earthy colours, and often quite masculine looking.  This time I wanted a pretty pony card, so instead of browns, I went with pink - well an embossed white horse on pink card (the running horses on the envelope were pink though).  The finishing touches were a couple of punched stars, some pink pirouette ribbon, and sponging around the edges of all the card and the pink pirouette patterned paper.


The layout of this card was based on the sketch challenge over at Stamping 411.  I love the simplicity of this sketch, and think I might have to file it away for future quick card reference:


 Now this card has me thinking about a possible  bargain bin project from my February challenge.  I see more pretty ponies in my future...  Stay tuned!

Box of Bargains - February Challenge

Okay, so I am sure I am not the only one who cannot resist looking through a bargain bin, seeing limitless potential in those discounted goodies, and then taking them home with the best of intentions, most often to gather dust.  I'm not the only one, right?

So here is my box of bargains with limitless potential - notebooks, post its, photo frames, wooden drawers, a mailbox (a little one!), coasters, more notebooks....

(not so bad, right?!)

And here is the challenge I set myself for this month.  Transform those bargains into beautiful things.  I may not get through the whole box, and I am okay with that, but hopefully I will get a few fun projects checked off the list (and make some room for future bargain bin treasures!)

Feel free to join me!