Pages

Wednesday, September 23, 2009

Campbell's thank you card

First a little bit of background.  Security at school is pretty strict.  The external doors are locked.  You have to be 'buzzed in' at the main entrance (we're still trying to get our heads round it all).  Before school the kids line up in their classes, and the teachers open various doors for them to come inside.  Yesterday Campbell was a little leisurely joining the line, and the door closed before he got there.  Normally that wouldn't be a problem, he would knock and they would let him in, but yesterday an alarm was going off at that end of the building, and the knocking went unheard.  Poor Campbell was not sure what to do, and feeling rather upset.  Locked out of school! Then a nice girl came along, and helped him.  Taking him down to the front office, so he could join his class.  Turns out, that nice girl, also happened to be his teachers daughter.  He was very impressed to find that out, and decided he should make her a card.  Who am I to argue with that!

After a brief conversation about what girls might like on their cards (hugs and kisses apparently - look out ladies!) he suggested that flowers may also work, and perhaps we could use the punches. So that is what we did, and this is what he came up with. 


He has obviously spent a bit of time watching Mum, as he had a very clear idea of what he wanted - right down to the layering of flowers, and 'those sparkly things' in the middle.  I especially like the filigree flower on the pink flower (and can hardly believe Campbell used them before I did!)


When it came to the inside I did make the suggestion that a pop-up card might be fun.  We stuck with the flowers, and I think it turned out really well.  I especially like the bigger flowers he suggested we add to the background.  His theory was 'she won't even notice they are not part of the pop-up Mum', and you know what?  I think he was right.

As for the hugs and kisses?  He didn't forget those!  They were added at the bottom, and double as maths homework too - 'look Mum - it's a pattern - x, o, x, o'   Homework has never been so much fun!

Tuesday, September 22, 2009

A 'No Photos' Scrapbook Layout

Do you remember the first time you really noticed your own heart beat?  Heard it?  Or felt it booming away in your chest?  Wondered what it was, and were delighted when you found out? 

I don't. But I was lucky enough to be nearby when Bridie did, and what a wonder filled moment that was!  Now I am the first to admit that when it comes to scrapbooking big life moments like birthdays and christmas I am not so flash.  New PJs and heartbeats though?  Not so shoddy!

When I saw the look on Bridie's face, when I told her the 'popping' she could feel in her chest was actually her heart beating (wonder and delight!) I knew I had to capture the moment for her.  I was elbow deep in dinner preparations at the time, so didn't get a photo at the time.  I thought about posing her later - perhaps an arty farty closeup of her little hand, clutching her chest again?  But really, it was the look on her face, and the wonder she was feeling, that I wanted to remember - and re-enacting it half an hour later wouldn't be the same.

So...  I set myself a challenge.  Scrapbook it without a photo - just the story.  And while we are doing challenges, use a patterned paper (I'm a patterned paper junkie, but often struggle to get them, especially the 'busier' ones, to work on my layouts).  Abandon that idea of A4/letter size, and get back to 12 x 12, and lets have some white space (green space?!) And most of all?  Make it quick and simple!


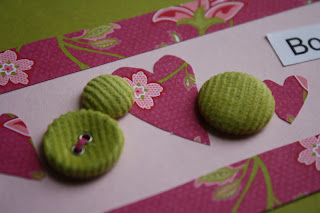
The first thing I did was find a patterned paper (Raspberry Tart DSP), and then the card to match(Kiwi Kiss, and Pink Pirouette).  The good thing about layouts without photos?  Doesn't matter what colours you use!  I had the idea of a big heart outline in my mind, and with the 'make it fast' challenge in mind, got to work cutting one out freehand.  Type up the story, print and cut ('freehand' again).


Then figure out some embellishments to fancy it up a bit.  I was pleased that the Kiwi Kiss corduroy buttons from the spring mini catalogue were just the right colour, as I love, love, love them!  The ones with holes have a 'faux' thread (thin strip of patterned paper threaded through).  The buttons without holes are actually like big brads at the back.  The smaller hearts were also cut from the patterned paper.


I will admit that I was tempted to add some stamping to that big green background, but I resisted - quick and simple being the rule for the day.  The title is annoying me a bit.  The 'straight but freehand, so not really straight' cutting technique works fine for the journalling, but the title looks a little sloppy, darn it.  I was going to pull it off, but the 2 way gluepen (which was GREAT for sticking on all those little bitty strips!) was just sticking too well. 

And then I figured - it's done already, stick it in the album, and move on.

So I did.  And it feels great!

Wednesday, September 16, 2009

Embossed wallets - and some lessons

After showing you this wallet a couple of posts ago - I did manage to experiment with some embossing and I was really pleased with how it turned out.  It has taken me a few days to get the post up though - the kids got hold of the wallets, and put them in a 'safe place' before I had managed to take the photo.  Lesson 1 - take photos of your projects before the kids start playing. 
Originally there was only going to be one embossed brown wallet to show you - that one you see there on the left.  I love how this turned out.  I cannot remember where I first saw this technique - the lady was using it on a wonderful handbag project she was making (if you have seen this, and remember, please let me know so I can give her the credit!)
Anyway, it is easy to do - just apply versamark ink to your project (yep - everywhere you want the embossing to be), add the clear embossing powder, and then before you heat it up to melt it, scrape some squiggly lines in it - removing a bit of the powder.  This means that when you do heat it to melt the embossing powder, the squiggly lines will not be shiny, and you will get a bit of a leathery look.
Lesson 2 - make sure you clean out your powder pal properly between projects.  It was only after I embossed the first brown wallet, and noticed it had a bad case of sparkly dandruff, that I discovered just how 'contaminated' my clear embossing powder was. Bother.
Lesson 3 - if the kids see it they will want one as well - not a new lesson that one of course, but I will confess, one I had momentarily forgotten.  Luckily Campbell decided that he actually really liked the brown with sparkly dandruff wallet - but couldn't we please make the inside red?  Bridie of course wanted pink with shiny flowers. 
So, for that one we used one of the flowers from the Fifth Avenue Floral set, some gold ink, and some of that contaminated powder (no good for versamark on brown card, but actually still okay to use on white card, or with metallic/white ink).  It doesn't show up all that well in the photo, but take my word for it - it looked stunning.  Especially stuffed full of the paper money that we promptly had to make.  I think I want one for me - expect, with real money instead of home made!
Lessons 4, 5, 6 and 7?  Embossing is easy.  Embossing is fun (the kids were fascinated!)  You can heat emboss with a good old toaster, but to be honest, I think for a project like the brown wallets, where you are embossing a larger area, the heat tool is fantastic.  If you are embossing both sides of a project remember that the first side you do may 'remelt' a bit when you do the second side - don't have it laying on your benchtop etc when you do that (and no - I didn't learn this last one the hard way!)

Thursday, September 10, 2009

Guest artist gifts for the teacher

Thank goodness for guest artists!  Perfect for those times when you are completely out of sorts, and haven't been creating, let alone blogging about it!  Please forgive me as I indulge in a guest artist post while I get my inspiration back...


Aren't these beautiful?  My clever sister Anna-lise made these as a thank you for my niece's daycare teacher.  I love how she has made her very own, one of a kind, patterned paper using the lovely 'Simply Said' stamp set. Being a two step stamping set this is just so versatile, and you know I am a big fan of DIY patterned paper!  The lovely script thank you is from the now retired, but still much loved 'Warm Words' set.
I do believe that the 'box in a bag' (bag in a box?) gift bag had yummy homemade fudge in it.  We love fudge too Anna-lise.  Just in case you had nothing better to do today!  And thank you, for being the guest artist, and helping me find my inspiration again (and what a bother I have to go and help at school in an hour!)