Pages

Showing posts with label children. Show all posts

Friday, February 11, 2011

Lots of Monster Valentines

It's that time of year again - Valentine production line!  I did think this year I might take the easy way out and just let the kids choose valentines from the shop, but both boys (and several of Hayden's friends) asked if I couldn't please make those same valentines we made last year?  

So we settled on a compromise. With coughs and sniffles in the house (mostly me!) I didn't think homemade treats would be a good idea, but we could still make the same matchbook style of valentine with chocolates from the shop.

As it turned out these valentines really don't take so long to make, when you don't make the chocolates too!  Both boys were keen for a monster theme so I got to have a play with the 'Make a Monster' stamp set.  4 sheets of white card and (apologies - I decided to use up some of my stash of retired card - taken with teal and green galore, and a splash of pumpkin pie) 12 sheets of coloured card later (and a bit of cutting, scoring, stamping and sticking) and we were good to go with 48 valentines.  

We stamped one of the greetings from the 'Something Sweet' set.  It seemed perfect for the occasion.  Bridie wants robots on her valentines, but she doesn't need them until Monday, so we still have a bit of time to work on them.  We just have to survive the boys impending sugar hit between now and then.  Wish me luck! 

Friday, November 12, 2010

scrapbooking disguised as homework?

I had been so sure that when the kids went back to school I was going to have lots of leisurely craft time ('lots' being relative to the zero leisurely craft time I had during the summer break!)  As it turns out all that sunshine must have caused some memory loss, because I had forgotten about the fact that when school went back we would be busier than ever.  Never mind the leisurely craft time, it's all about the taxi driving, the school activities, the taxi driving, the after school activities, the work trips for Peter, the taxi driving, and trying to keep on top of the laundry.   Then you need to remember those other key ingredients that seem to have been lacking lately - inclination and inspiration.  There has been a bit of a craft drought around here lately, so thank goodness for homework!


When Campbell came home and told me he had to make a family tree for school, and asked if I had a stamp he could use, I was pleased to tell him I had something even better.  It was the perfect excuse to finally try my new Big Shot, and the 'little leaves' sizzlet die, and in no time at all he had more than enough leaves for his tree. It took a lot longer to stick them all on!  The tree trunk and grass we cut by hand, and he used punches to cut out all the photos and name labels.  We used a piece of 12x12 card as the base for the family tree, so that when he was finished he could put it straight into his album, and he is so pleased with his first ever, made it himself, scrapbook page.

I am pleased that the craft drought may finally be breaking, even if it is just homework disguised as scrapbooking!

Tuesday, February 23, 2010

The 'Back and Forth' Book

One of the treasures I had stashed away in the box of bargains was a simple exercise book (or composition book, if you prefer!)  Not exactly an amazing bargain, but I had bought it with a specific project in mind.  I wanted to use it as a 'back and forth' book for our son Hayden, in an attempt to encourage him with his writing.  Now if you know Hayden you know he doesn't lack good topics to talk about, or the words to do it (and he can do it for a loooong time!)  When it comes to writing though he is not so keen.  Why write it when you can just say it?!  I figured anything is better than nothing though, and a book for him to write whatever he wants for us to read, and for us to write back to him, might be worth a try (and hopefully wouldn't feel too much like homework!)

We could have just used the exercise book as it was, but I think that if it looks kind of special, then he might take it more seriously, and even treasure it a bit more.  I am pleased to say the effort was worth it - he thinks it is pretty cool, and the other kids are lining up now to get their own (I might have to check what else I can find in that bargain box!)  I didn't take a before photo - I am sure you can picture it in all it's 'ready for school work' glory.  Here is the after photo - and not a hint of school to be seen:
At first I was planning to use the Baja Blue patterned papers, but when I went to get them from the box I saw this spotty paper from the Urban Oasis pack, and changed my mind. I am so glad I did.  I think the baja papers might have looked a bit too baby boy, while this combo looks much better suited to a newly turned 10 year old.

Being stingy, I wanted to use just one sheet of paper to cover the front and the back of the book.  Of course, it wasn't going to be wide enough, so I used some narrow strips of 'going gray' and a kraft spine to hide the gaps.  I added some double rectangle punching to the edge of the kraft card, to let the gray show through, and add a little interest, without getting all girly.

The 'To you, from me' bit was done using the long retired (but not forgotten!) Newsprint Alphabet stamp set, with kiwi kiss ink.  I matted it on gray and kraft, and added a few linen thread stitches to fancy it up a bit. I also added a touch of twill tape, to match the piece that attaches to the spine, that will be used to mark our place in the book.  Love those built in book marks!
I finished it up with a few circle embellishments.  The Wild West Alphabet 'H' was punched then matted on a 1 3/4" circle of kraft card that fitted perfectly in the aluminum metal edged tag.  I added a couple of circle and star designer brads next to that and three plain little silver brads at the top of the kraft spine.


Inside the book I kept it pretty simple - after all, writing is supposed to fill that bit up!  I couldn't resist adding a little bit of encouragement and inspiration though, so searched my stamp sets for appropriate stamps, cut them out and attached them to random pages throughout the book.


And there was one last embellishment added to the back cover (so not quite so obvious) - a little bit of icky 'Mum loves you' stuff!


So far, so good with the back and forth book.
Not too homework feeling at all!

Monday, November 23, 2009

Yummy Scrummy Muffins all ready to go

Remember this stunt muffin?

Well today was the day to bake the actual muffins - Apple and Cranberry - yuuummm!!  While the muffins were cooling the kids and I lined up around the table and got a proper little production line going.  I was going to take a photo of them in action but then realised we were probably breaking umpteen different child labour laws, so perhaps photographic evidence wouldn't be the best!  Instead, here is a photo of those well dressed muffins all lined up and ready to go.


Campbell was a little concerned that we wouldn't know which ones were which once we put them all in one spot.  Then he realised that we could just look at the tags - because, afterall - his colouring in was WAY better than Bridie's - 'she just used all orange...'  I assured him that Bridie's teachers will love all orange just as much as she does.  That made it okay (just as long as they don't get mixed up in the mean time!)

Wednesday, September 23, 2009

Campbell's thank you card

First a little bit of background.  Security at school is pretty strict.  The external doors are locked.  You have to be 'buzzed in' at the main entrance (we're still trying to get our heads round it all).  Before school the kids line up in their classes, and the teachers open various doors for them to come inside.  Yesterday Campbell was a little leisurely joining the line, and the door closed before he got there.  Normally that wouldn't be a problem, he would knock and they would let him in, but yesterday an alarm was going off at that end of the building, and the knocking went unheard.  Poor Campbell was not sure what to do, and feeling rather upset.  Locked out of school! Then a nice girl came along, and helped him.  Taking him down to the front office, so he could join his class.  Turns out, that nice girl, also happened to be his teachers daughter.  He was very impressed to find that out, and decided he should make her a card.  Who am I to argue with that!

After a brief conversation about what girls might like on their cards (hugs and kisses apparently - look out ladies!) he suggested that flowers may also work, and perhaps we could use the punches. So that is what we did, and this is what he came up with. 


He has obviously spent a bit of time watching Mum, as he had a very clear idea of what he wanted - right down to the layering of flowers, and 'those sparkly things' in the middle.  I especially like the filigree flower on the pink flower (and can hardly believe Campbell used them before I did!)


When it came to the inside I did make the suggestion that a pop-up card might be fun.  We stuck with the flowers, and I think it turned out really well.  I especially like the bigger flowers he suggested we add to the background.  His theory was 'she won't even notice they are not part of the pop-up Mum', and you know what?  I think he was right.

As for the hugs and kisses?  He didn't forget those!  They were added at the bottom, and double as maths homework too - 'look Mum - it's a pattern - x, o, x, o'   Homework has never been so much fun!

Wednesday, September 16, 2009

Embossed wallets - and some lessons

After showing you this wallet a couple of posts ago - I did manage to experiment with some embossing and I was really pleased with how it turned out.  It has taken me a few days to get the post up though - the kids got hold of the wallets, and put them in a 'safe place' before I had managed to take the photo.  Lesson 1 - take photos of your projects before the kids start playing. 
Originally there was only going to be one embossed brown wallet to show you - that one you see there on the left.  I love how this turned out.  I cannot remember where I first saw this technique - the lady was using it on a wonderful handbag project she was making (if you have seen this, and remember, please let me know so I can give her the credit!)
Anyway, it is easy to do - just apply versamark ink to your project (yep - everywhere you want the embossing to be), add the clear embossing powder, and then before you heat it up to melt it, scrape some squiggly lines in it - removing a bit of the powder.  This means that when you do heat it to melt the embossing powder, the squiggly lines will not be shiny, and you will get a bit of a leathery look.
Lesson 2 - make sure you clean out your powder pal properly between projects.  It was only after I embossed the first brown wallet, and noticed it had a bad case of sparkly dandruff, that I discovered just how 'contaminated' my clear embossing powder was. Bother.
Lesson 3 - if the kids see it they will want one as well - not a new lesson that one of course, but I will confess, one I had momentarily forgotten.  Luckily Campbell decided that he actually really liked the brown with sparkly dandruff wallet - but couldn't we please make the inside red?  Bridie of course wanted pink with shiny flowers. 
So, for that one we used one of the flowers from the Fifth Avenue Floral set, some gold ink, and some of that contaminated powder (no good for versamark on brown card, but actually still okay to use on white card, or with metallic/white ink).  It doesn't show up all that well in the photo, but take my word for it - it looked stunning.  Especially stuffed full of the paper money that we promptly had to make.  I think I want one for me - expect, with real money instead of home made!
Lessons 4, 5, 6 and 7?  Embossing is easy.  Embossing is fun (the kids were fascinated!)  You can heat emboss with a good old toaster, but to be honest, I think for a project like the brown wallets, where you are embossing a larger area, the heat tool is fantastic.  If you are embossing both sides of a project remember that the first side you do may 'remelt' a bit when you do the second side - don't have it laying on your benchtop etc when you do that (and no - I didn't learn this last one the hard way!)

Thursday, July 9, 2009

Holiday Scrapbook Kits for my Boys

This is a project that I am feeling really excited about. In an attempt to better document my children's perspectives of the adventures they are having I decided to have the boys scrapbook those adventures themselves! Hayden is 9 so should be able to manage this fine, Campbell is 5 - he will be dictating any journaling and I will write it for him.

Other than that, I am hoping I will be able to let them do their thing. Hoping. I may find myself jumping in with a suggestion here and there, and obviously the basis of it all was my doing, but still, better than all done by me, right?
So here is the holiday scrapbook box. It includes albums, spare pages, embellishments, and any bits and pieces they gather along the way, that are waiting to be included in their scrapbooks.


I made two mini albums (8 x 8 inches - not so big that it is intimidating, but big enough to fit those treasures I am sure they will accumulate!) The colours came straight from a Kristina Werner Challenge a few weeks back - nice and summery (oh yes, we get to enjoy two summers this year!) and perfect for boys. Apart from a couple of little differences on the front, so we can tell them apart, the albums are the same. I decided to stick with the same colours for both, so that the box of goodies could just be divided between them without, hopefully, any arguments.


To get them started I have made a few pages of various sizes and colours. A few are already in the albums (to give it an actual album feel - it was amazing how excited they were to see those few blank pages waiting for them in THEIR albums!) The rest are waiting in the box. I have also included a few envelopes and memo cards (some decorated with a strip of patterned paper, some not). I wasn't sure how into it they would be when I first was putting it all together, so tried to keep it nice and simple (I figured I could always recycle those pages for something else!) The boys know too, that if they need something else - different size or colour etc, we can make it to suit.
Also in the box, a selection of embellishments - punched shapes, stamped images and journaling squares, strips of patterned paper for borders, and card for titles. Once again, this is just a starting point. We can add any other embellishments as we go along.

So how is it going? Better than I had hoped! Both boys are really excited about this project. I was a little worried that it might feel a bit too much like holiday homework (not the intention, but, just quietly, an added bonus of a project like this!) but so far that hasn't been the case. They are excited to choose photos, and put the pages together. We have had a few fun activities happening over the past couple of weeks, so there is a bit of catch up to do. Letting them choose what they want to document, when, is part of the fun for them. Interesting for me too. I was sure that Campbell would want to start with his T Ball classes - he has really been enjoying them, and so looks forward to Mondays at the moment. But no. The thing he most wanted to document .... when Daddy hid Jaffas (yummy NZ candy for those North American readers!) in the popcorn when we had a movie night last week. Here it is...


Confession time. That isn't the actual popcorn. We didn't take a photo at the time. Campbell suggested we could maybe make some more and take a photo of that. Ulterior motives perhaps? Maybe. Stunt popcorn tastes delicious! As for those jaffas - I might have suggested that we could maybe use this circle punch to make some.... but Campbell picked the red card, did the punching, cut one in half and requested that I please write 'chomp' next to that one. Such a fun thing to do together!

And check out this proud boy showing Daddy his first scrapbook page...


This project just gets better and better! (did I mention Miss Bridie yet? Oh yep - she wants in on the action too - tune in next time for Bridie's Mini Album!)

Wednesday, July 8, 2009

Aiming to scrapbook from a different perspective

A couple of weeks ago I had a reminder that my children see the world differently from me, a lot of the time. That isn't a new thing. Most mornings I ask Bridie what she wants for breakfast, and she replies, with total outrage in her voice, she doesn't want breakfast, she wants FOOD!! Just to clarify, most times, when Bridie wants FOOD, she actually means potato chips. And there I was thinking breakfast was food too! (For the record - she doesn't get potato chips!) Different perspectives - it's kind of hard to miss.
When it comes to documenting their adventures and achievements though, I am guilty of forgetting about that. Most times I am documenting what I think is important, the way that I saw it, and hoping that they like the final product. They do (whew), but they are liking the way Mummy documented her perspective of their activity. This month I am aiming to include a lot more of their own perspective in my projects, their projects, our projects.

So how to go about doing that? I have a few ideas, and a couple of projects that we have started on. I want this mixture of perspectives to be the beginning of an ongoing change, so I am thinking these ideas and projects need to be easy things, or they might not happen.

  • Maybe the easiest thing to do will be handing the camera over. This is not a new thing - we have done it before, but actually using those photos for a project is the next crucial step. Juggling one camera between three children will also prove interesting (and may even be worthy of a scrapbook layout of its own!) We are about the head off for a few days holiday, so we shall see how that goes...

  • Getting their input into my layouts - especially those layouts about things we have experienced together. That is not difficult, right? Finding out what did they like? What did they not like? What was their favourite bit? We all went to a symphony orchestra concert at an incredible outdoor venue at the weekend. On the way home we asked them for one word to describe the evening. Bridie said 'the music was AMAZING'. Hayden wanted to go with amazing too, but changed it to EXCITING. Campbell summed it all up with 'WOO HOOO!' Are those not great words for a layout?

  • There is a park nearby that we go to often. It has occurred to me that we all love it there, and all for different reasons. Bridie loves the playground. Campbell loves that he plays T Ball there. Hayden loves looking for bugs, and wildlife. Peter was amazed to see a wild deer roaming around. And I am loving taking photos of all the beautiful wild flowers and plants. Next time we go I am planning on taking photos of every one's favourite bits and putting it together on a layout. Watch this space!!

  • Perhaps the thing I am most excited about, are the 'holiday scrapbook kits' I have made up for the boys. Of course then Bridie wanted one too. Mini albums for them to scrapbook themselves, with a little help as required. So far so good - the kids are as excited as I am. Campbell has 'scheduled a meeting' for tomorrow morning. When I am reading the newspaper, he has asked that I please come into his room so we can have a talk about his scrapbook. Bridie wants to write some more of her 'story' tomorrow please, and Hayden has requested we print out some photos tomorrow so he can get stuck in. Did I mention we are supposed to be going on holiday tomorrow kids? LOVING the enthusiasm!

So that is the plan so far. Does any one have any other good ideas for scrapbooking with children? Any suggestions would be most welcome.

Oh, and sorry about all the words (and no pictures) this post. I promise, we have photos coming - especially now there are FOUR scrapbookers in the house!

Monday, May 11, 2009

gifts from my boys

So it seems over the last week or two, both my boys have been busy at school working on the most wonderful Mothers Day gifts ever. I just had to share them...
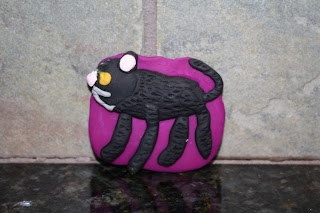
From Hayden, there was a card - complete with a pop up heart (I think I might have to try that some time!) and a fridge magnet he had made himself. Now that in itself is lovely, but what made it extra special?


That's our cat Jude. We are all missing her a lot! She is a pretty well travelled cat (7 or 8 plane trips, including international flights), but at 15 years old, travelling with us this time just wasn't an option. Instead she went to live with Nan and Pop, where, by all accounts, she is turning into a fat, fat cat. Clearly, she isn't missing us as much!

As for Campbell - he proudly presented me with this beautifully decorated box...

most definitely filled with treasure....


Isn't that just perfect?
Thank you boys, and a big thank you to the teachers as well.
With the end of school fast approaching (only two more weeks for Campbell!) we will be working on presents for the teachers over the next week or two. I will be sure to give you a peek at what we come up with - pretty sure it will involve cutting and sticking, and maybe even a stamp or two!

Monday, April 27, 2009

A monster of a Kristina Challenge

Time for another of Kristina Werner's colour inspirations. This time she is doing it a little differently - instead of specific SU colours, she has gone with broader colours - brown, red, yellow, turquoise and white. So now it is even easier for us all to give it a go - so off you go - make something!

I was determined to make something, and have been thinking about what I might do. I had a plan that involved lots of flowers. In fact, I had stamped out the flowers, and had just about cut them all out, when the plan changed, and this happened instead...


Cute monsters huh?! It was much easier than the flowers too, - all made with bunches of punches (oh dear, did I really just write that?!) The reason for the plan change? I blame Campbell. He came to see what I was making. After admiring all those flowers, he announced he had made something at school last week and had forgotten to show me. Would I like to see it now? Well of course I would, bring it on! So he did. And here it is...


A little monster. The cutest little monster I have seen in a while. When I told him so he suggested maybe I could make one too, when I had finished with all those flowers. As you can see, the flowers were relegated to the background, and out came the punches - I do love my punches - and some more little monsters were born...


Made by Tracee, and Campbell!

The SU card colours I used for this were Red Riding Hood (new incolour) tempting turquoise, chocolate chip, so saffron, and whisper white. The sentiments, stamped in Red Riding Hood, are from the Family Phrases stamp set. Not forgetting of course - an assortment of punches - 1 3/8" square, word window, 1/4" circle, and the 1/2" circle.


Monday, March 16, 2009

'This is for you Mum'

And this is the face that went with those words.
I know I promised the next post would be about colouring those flowers, but who could resist this? Campbell had been 'helping' me with that sample stamping for the last post, and when we had finished he asked if he could have it.
'sure, there you go'
'Can we make it into a card' he asked.
'Who do you want to give a card to'
'Someone who loves me.
And someone who loves the colour blue' he replied.
So of course, we had to make a card - quick smart.

It needed the words 'I love you', and a heart.
We used some more scraps of card, stuck it down, and we were done.

Campbell was pretty pleased with how it turned out.

I then had to write the 'big words' for him.
He signed his name.


And I promise, I acted very surprised when he proudly announced
'This is for you Mum'.
(colouring flowers, next post - I promise!)


Monday, March 9, 2009

Cards for the Class


This is the card we made for Hayden to give to all his classmates. Not the traditional 'red hearts' kind of Valentines day kind of card, but we thought it was perfect for a boy to give out on his first Valentines day. Especially when the boy does still have a bit of an obsession with bugs!


Most importantly, this was a quick, easy card to make. We needed at least 24 - it was never going to be complicated!


Recipe for this one...
  • Wild Wasabi, Certainly Celery and whisper white card
  • Wasabi and Celery ink
  • 'Bugs and Kisses' for the dragonfly
  • 'Garden Whimsey' for the sentiment (would also make great, easy 'journaling' on a scrapbook project I think)
  • Wild Wasabi double stitched grosgrain ribbon.

Wednesday, March 4, 2009

Spring Special!

The 'Spring Flowers' and 'Spring Showers' Designer patterned paper packs from SU have both been keeping a low profile for the past year. Although they have been available to purchase, they were missed from the catalogue, so of course, people didn't always know about them.

Both sets have the same designs, but the colours are slightly different. 'Flowers' has coral and moss in the mix, while 'showers' has bashful blue and caramel. Although both sets do contain some floral papers, they also include pages with more 'neutral' patterns, so can be used for both feminine and masculine projects. (I have a pdf file with the swatches for both sets. Email me if you would like me to send it to you). They also coordinate perfectly with the 'Looks like Spring' stamp set and the 'Spring Flower Bouquet' three flower punch. And they are retiring this month!

So here are some samples for you, two of my favourite scrapbook layouts. These will be familiar to many of you - they have done the rounds on my display boards!

Firstly though, a little side note about the photos. The lighting in our apartment is terrible. I am still trying to figure out just how best to photograph projects here, so please excuse the less than great photos! (and remember, if you click on the photos they will enlarge, which may make it easier to see the details!)

For this layout I cut around the outline of the flowers from the patterned paper. It took AGES, but I was really pleased with the finished look.
Ingredients for 'Safe' Layout (All SU!):
  • Spring Flowers Designer papers (using three of the patterns from the pack)
  • Mellow Moss and Very Vanilla Card
  • Mellow Moss Ink
  • Big Deal Aphabet stamps
  • Rough Edges Alphabet stamps (retiring this month - get in quick!)
  • A-Z accents stamps (for the little tag - retired last year - sorry!)
  • Black Stampin' Write Journaller, Hemp Twine, Stampin' Dimensionals, sponges
Ingredients for 'Plotting Mischief' layout (All SU!):
  • Spring Showers Designer papers (using three of the patterns from the pack)
  • Creamy Caramel and Very Vanilla cardstock
  • Creamy Caramel and Bashful Blue Ink
  • Looks Like Spring stamps (retiring this month)
  • It's a Date stamps (retiring this month)
  • Warm Words
  • Day to Day flexible Phrases stamps (retired already)
  • Newsprint Alphabet stamps (retired already)
  • Round Tab Punch
  • Spring Bouquet Flower Punch (retiring this month)
For this second layout I decided not to cut the flowers out! Instead I used the stamp set 'Looks like Spring'. The large flowers are stamped and cut by hand. The smaller flowers are stamped and then punched using the Spring Bouquet punch. The three different flowers line up oerfectly with the three different flowers on the stamp, making it a quick, easy, and best of all, unique embellishment for your projects.

As mentioned, all these lovely spring products (papers, stamps and punch) are retiring this month. The good news is they are on special!


Both paper packs have 50% off - now $6.98 +pp (and just think, in the catalogue last year they were $19.95, so it jst gets better and better!)

The Punch has 25% off - now $26.95 +pp

and the Looks Like Spring stamp set is part of SU's Red Cross Bushfire Appeal. No discount to you, but 50% will be donated to the appeal to support those people affected by the recent Victorian Bushfires. I will cover the postage on all bushfire sets. Contact me for more info!


Of course, being on the retired list these products will not be available after March 31, or sooner, if they sell out - no backorders available. Get in quick if you are keen!


Happy Stamping!

Tuesday, March 3, 2009

Hayden's Ahoy Matey Birthday Card

This set is a favourite of Hayden and Campbell's - both to receive projects, and make their own.
When it came time to make a birthday card for Hayden it was an obvious choice. To make it a little different from previous 'pirate' cards I decided to make it a spinner card (when you move the card from side to side that little pirate bird spins and slides along the 'ahoy matey' track).


And who wouldn't want a pirate chest overflowing with treasure? To make this I stamped with chocolate chip ink on Close to cocoa card. Then I cut the lid off the chest, sponged both pieces with cocoa ink to give them a grubby pirate look, and then attached both pieces to the front of the card, with the lid on an angle to look like it was opening.
For the treasure I used a mixture of silver and rhinestone brads. For added sparkle (you will have to take my word for that as it doesn't show up so well in the photo) I used a two way glue pen to get in between the brads, and then sprinkled on the dazzling diamonds. Might have been easier to put the glitter on before the brads, but it was one of those projects that evolved as it went along - I didn't know I was going to use the glitter until after the brads were on!
And of course for the base of the card, those lovely in colours - soft sky and blue bayou - My favourite colour combination at the moment I think. Stamping with soft sky ink onto the soft sky card (or any other same colour ink/card combo) gives nice subtle interest, without overwhelming the project.
If you want to replicate anything you see here, this is what you will need:
Ahoy Matey Stamp set (retiring this month - get in quick!)
Card: soft sky, blue bayou, whisper white, close to cocoa
Ink: Chocolate chip, soft sky, blue bayou
Stampin' Write Markers: (to colour the bird) bashful blue, barely banana
Punches: word window, 1 1/4 inch circle, 1 3/8 inch circle
'Sparkly Bits': Rhinestone brads (ice), silver brads (vintage), dazzling diamonds glitter
two way glue pen, stampin' dimensionals
And if you would like to know how to make a spinner card, contact me. I am pretty sure I have some instructions all written out already!