Pages

Showing posts with label stamp-a-ma-jig. Show all posts

Tuesday, February 9, 2010

Simple but beautiful butterfly card

I am really loving the butterfly stamp from the 'Dreams du Jour' set right now.  I love the fact that it is an outline stamp, so if you want to colour it in, like I did for this Kristina Challenge card, you can.  I also love the fact that there is enough fine detail in that outline, that if you want to, you can just stamp it out in a single colour and it still looks fantastic - especially if you have a few in different colours:


For this card I really wanted the focus to be on those butterflies, and originally set out to have just some stamping on a single piece of white card.  Unfortunately the white card, while perfect for stamping on, is not the heaviest, and the card seemed a bit too flimsy.  Instead I trimmed it up and attached it to a teal card base, to match that teal sentiment.  I was pleased with the finished look - having the teal didn't take away from the butterflies at all, and I think I ended up with a more balanced card.

 
The colour combination of taken with teal, real red, and apricot appeal came straight from the latest Stamping 411 colour inspiration challenge.  I used my stamp-a-ma-jig to get everything positioned just where I wanted it, but other than that, this card was super simple, and I now I think I love those butterflies even more!

Friday, October 2, 2009

Making use of those little image stamps

In an attempt to get back into the crafting groove I have been setting myself some challenges.  The latest one is to make use of those little image stamps that you often find in a set.  In particular, I am looking at the great little 'short and sweet' stamp set.  This is a popular, value for money stamp set, but I find I am most often using the greetings, and not often the little images that go along.


So, over the next little bit I am hoping to share a few ideas using these little stamps.   The first, and easiest idea is of course to use those little stamps on little projects - gift tags and smaller cards.  The cute little 'Love Notes' (card and matching envelope) are the perfect size.  The second idea, and one I also used for these cards, is repetition.  Use that little image more than once, to make it look like a bigger image.  I used the stamp-a-ma-jig to help with even spacing.  Take that little flower and stamp it out nine times, and this is what you get:


This time I also set myself the challenge of using only the bold bright colours.  I do have a couple that I use often, but must confess, overall I am not so much of a bold brights girl (and in fact, I discovered that a couple of my BB ink spots hadn't even been opened before these cards!)  I am pleased to say that I have used every single bold bright colour in these cards - and I actually really like them!  The fact that the image is a small outline one, means that you get a nice splash of colour, but lots of white also helps to tone it down.  That's what I think anyway - what do you think?


Best of all, this idea works just as well on a more conventional sized card (and look - the last of those bold bright colours!)

Sunday, June 21, 2009

An accordian spine mini coaster book...

Once upon a time there was a boy who went to a cartooning class. The boy loved it, and wanted to spend almost every moment after that, designing, creating, and mass producing comic books, which he intended to sell to his family.... I am guessing that is just the first chapter of that story, rather than 'The End'!

For my part, I decided to make Hayden a special little coaster book, that he could turn into a limited edition Hayden Jones comic. These little books are easy to make, and a great way to use up those scraps. Some of you have done them in a class or workshop with me before.
When it came to decorating the covers, I wanted to keep them simple (not knowing what story Hayden would be telling), but not completely blank. One of my favourite stampsets in the new catalogue is the 'Once Upon a Time' set. This set may not be quite as versatile as some of them, but it was one of my must haves (and I cannot quite explain that myself!) This was the perfect project to get some ink on it for the first time...


The verse on the front cover - Once upon a time - is actually one long stamp. I used sticky tape and my Stamp-a-ma-jig to stamp it in two shorter lengths, so it would fit the cover better.

Why sticky tape? Use it to cover the part of the stamp that you do not want inked up, ink the entire stamp, remove the sticky tape, and stamp as usual. The part of the stamp that was under the tape will remain 'clean' and will not leave an image. As for the back cover? 'The End' of course!


This is what the inside of the mini book looks like (pre-cartooning). The spine of the book is an accordian fold - the number of pages in the book depends on the number of mountain folds, and can be adjusted to suit. A length of ribbon sandwiched between the double coaster covers prevents the accordian spine opening out too far, and also doubles as a way to hold the mini book closed.

These little books are great for mini scrapbooking projects, and make wonderful gifts. The colour used in this one is Baja Breeze (card, ink, ribbon, and patterned paper).

Thursday, April 30, 2009

Stamp-a-ma-jig 101

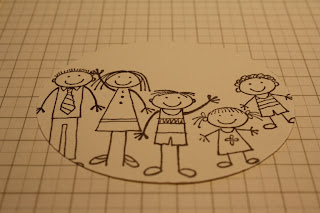
Today I was playing with the 'All in the Family' stamp set - lots of different heads and bodies to put together however you like. Of course, it is possible to line them up 'freehand', but to be really sure the heads were going to attach to the bodies, I decided to use my stamp-a-ma-jig.


Many of you probably have a stamp-a-ma-jig, and know how to use it, but for those of you who may not, here is a little rundown.


The stamp-a-ma-jig consists of a clear imaging sheet (plastic square), and a black handle. The first thing I should point out is that for this exercise, I am not using the imaging sheet provided. Because most times I use this set, I end up also using the stamp-a-ma-jig, I finally got around to doing something that someone in my SU team once recommended (sorry, cannot remember who - anyone keen to take the credit for this great idea?) I went ahead and made some permanent imaging sheets. I cut a sheet of vellum into squares (7 x 7cm) and in each corner stamped a different stamp, using the stamp-a-ma-jig. That will save time in the future!


So anyway, how to use the stamp-a-ma-jig...
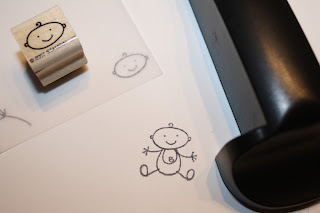
1. I started by stamping the 'baby body' onto my card (I didn't use the stamp-a-ma-jig for that bit).


2. Line the corner of the imaging sheet up with the base of the handle. Stamp the baby head onto the corner of the imaging sheet - making sure to keep the edge of the wooden stamp block up against the corners of the handle.


3. Lay the imaging sheet over the stamped card, and position so that the head attaches to the body.


4. Reposition the handle so that it once again lines up with the corner of the imaging sheet - making sure not to move either the card, or the imaging sheet. ( I should point out here, I am left handed, so often have the handle to the right of the action, and at the bottom of the imaging sheet. It will work with the handle to the right or left, and you can also turn it around so it is at the top of the imaging sheet if you prefer!)


4. When you are happy with the positioning, carefully remove the imaging sheet, taking care not to move the handle, or card.


5. Reink the stamp, and carefully line the edges of the wooden block up with the edges of the handle. Stamp the image.


6. Ta daa! Your stamp is positioned PERFECTLY!


Especially handy when you want to stamp out the whole family.....
and of course, any other time you want to make sure you stamp in just the right spot!
If you feel nervous about stamping straight on to your project (such as a nearly completed scrapbook layout - eek!) then this could be the tool for you.
(this may be the last 'stamp-a-ma-jig' post for a while - what a pain to have to keep writing 'stamp-a-ma-jig' over and over!)